- Location
- Nova Scotia, Canada
I am reassembling my sn superjet and as a newbie I am in way over my head. My shop manual assumes I am a semi-competent mechanic, so it leaves a few questions unanswered.
So here they are. >")
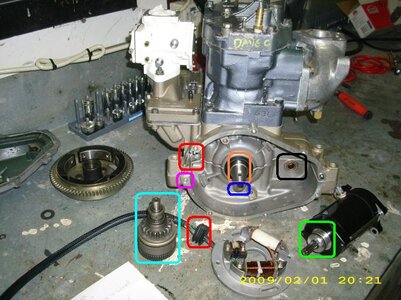
I am attaching a picture to indicate what I'm talking about - the colored lines are more for my benefit than yours (for example, I'm sure you could identify the ""starter"" in the picture) - with colors it will be apparent if I'm talking about the wrong item or area.
(1) Should I put grease around starter seal? (green) I would be using JSS's "silicone grease".
(2) Where should idle gear be greased? (light blue) (ps is the idler gear also called a bendix?)
(3) Should I put grease on the grommet shown? (red)
(4) Is the dowell pin on the left side absolutely needed? (purple) Don't the seven bolts keep it lined up enough? (I seem to have lost one of the dowell pins, and I don't have a yamaha dealer in my area, and I don't want to wait a whole week for one to arrive in the mail.)
(5) Should grease or 2 stroke oil or anything else be applied to the flywheel shaft / key? (orange)
(6) One of the shop manuals does say that 2 stroke oil should be applied to the shaft's bolt and bolt flange. (dark blue) Why would they recommend that? I would have thought that cleaning the bolt and putting some locktite would be a better idea.
(7) The spot where the idler gear inserts into.. (black) I thought I read that that is supposed to be a bearing, but mine appears to simply be a hole. I hope that's right. I can push the idler gear assembly into the hole and it seems to stay, but is there anything else that is supposed to hold it in place? I guess it does press against the cover after its on (spring, washer, etc) - maybe that's all that's needed.
Thanks............
So here they are. >
I am attaching a picture to indicate what I'm talking about - the colored lines are more for my benefit than yours (for example, I'm sure you could identify the ""starter"" in the picture) - with colors it will be apparent if I'm talking about the wrong item or area.
(1) Should I put grease around starter seal? (green) I would be using JSS's "silicone grease".
(2) Where should idle gear be greased? (light blue) (ps is the idler gear also called a bendix?)
(3) Should I put grease on the grommet shown? (red)
(4) Is the dowell pin on the left side absolutely needed? (purple) Don't the seven bolts keep it lined up enough? (I seem to have lost one of the dowell pins, and I don't have a yamaha dealer in my area, and I don't want to wait a whole week for one to arrive in the mail.)
(5) Should grease or 2 stroke oil or anything else be applied to the flywheel shaft / key? (orange)
(6) One of the shop manuals does say that 2 stroke oil should be applied to the shaft's bolt and bolt flange. (dark blue) Why would they recommend that? I would have thought that cleaning the bolt and putting some locktite would be a better idea.
(7) The spot where the idler gear inserts into.. (black) I thought I read that that is supposed to be a bearing, but mine appears to simply be a hole. I hope that's right. I can push the idler gear assembly into the hole and it seems to stay, but is there anything else that is supposed to hold it in place? I guess it does press against the cover after its on (spring, washer, etc) - maybe that's all that's needed.
Thanks............