Crankshaft Damage

Mike W

Infidel
Location
North Florida
I tried to search for an old thread that talked about the same kind of damage I just ran into but I just can't find it or anything like it.
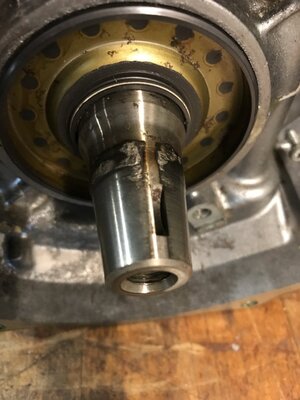
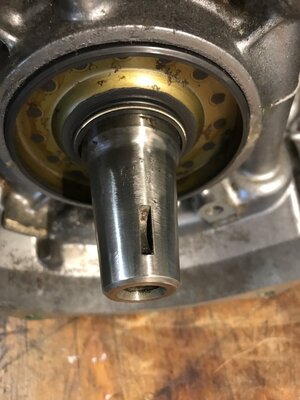
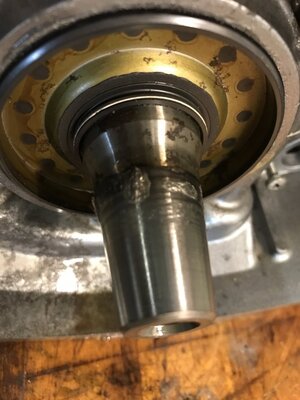
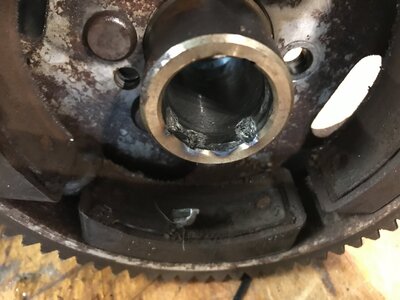
Anyway, after a quick looks see behind the flywheel cover on my X2 before I put the tank back in I found an absolute mess. So I tried removing the flywheel in order to clean everything up but the flywheel was stuck and wouldn't come off. So I removed the motor and I was finally able to get the flywheel off. In the process of removing it with my puller it looked like the woodruff key was jammed which kept it from coming off. As you can see in the pictures the flywheel and crankshaft started sharing metals at some point in the past so now I need to find out how to fix the crankshaft? The flywheel is a goner so I will be looking for a replacement. Any suggestions?
IMG_1995.JPG IMG_1996.JPG
 

Mike W

Infidel
Location
North Florida
Looks like it was welded and the welds broke?

It definitely wasn't welded. You can tell the flywheel was loose on the crankshaft which caused this. I forgot to mention that the rivets that held the flywheel together were loose. Not 100% sure I did that trying to remove it though.

Show pic of the Key Groove....... May could get remachined. and have the snout of the crank turned and cleaned up.

The key groove is perfect. I'm thinking that the previous owner removed the flywheel at some point to replace the bendix but doinked up when he reassembled it and it wasn't seated somehow. I could tell whoever worked on it didn't know what they were doing because he had the large bendix washer on the front of the bendix, not on the crankcase side.

I'm trying to fix this without having to take the motor apart any help is appreciated. There was a thread a year or two ago about this same issue.

IMG_1998.JPG
 
Last edited:

JetManiac

Stoked
Site Supporter
Vendor Account
Location
orlando
Remove the worst high spots, then use Valve grinding compound and your flywheel with no key in. Then turn the flywheel to lap the 2 to match. Clean and test lap by installing flywheel with no key and tap it with a hammer, then turn flywheel to see if it will turn over motor without slipping.
 

Mike W

Infidel
Location
North Florida
Remove the worst high spots, then use Valve grinding compound and your flywheel with no key in. Then turn the flywheel to lap the 2 to match. Clean and test lap by installing flywheel with no key and tap it with a hammer, then turn flywheel to see if it will turn over motor without slipping.

Will do. I was able to remove the high spots but waiting on my replacement flywheel to do anything further. Thanks for the tip.
IMG_2008.JPG
 

CD155MX

Squirrel!!!
Location
Alta Loma, CA
lightly sand, then use lapping compound to smooth out.

Remove the worst high spots, then use Valve grinding compound and your flywheel with no key in. Then turn the flywheel to lap the 2 to match. Clean and test lap by installing flywheel with no key and tap it with a hammer, then turn flywheel to see if it will turn over motor without slipping.

Going to file these helpful pieces of info away in the back of my mind for a rainy day. THX!
 

cookn

Kamikaze
Location
where you live
I have an old 550 that has done this twice, the first time the flywheel nut bored right through the cover. I did what jetmaniac said and ran it and it was fine. My problem was that the flywheel nut was coming loose because I didnt have the lock washer with the tabs that bend around the nut but it looks like your crank uses a bolt
 

Mike W

Infidel
Location
North Florida
I have an old 550 that has done this twice, the first time the flywheel nut bored right through the cover. I did what jetmaniac said and ran it and it was fine. My problem was that the flywheel nut was coming loose because I didnt have the lock washer with the tabs that bend around the nut but it looks like your crank uses a bolt

It does. Kawasaki 650's use a bolt just like Yamaha's.
 
Top Bottom