Other What did you fab up today? A thread for the home fabricators!

smokeysevin

one man with a couch
Location
Houston
I hope to be able to do this one day, I have a tig that's capable , I haven't gotten the Argon, expendibles and hooked it all up yet though.

I grabbed the argon and tried my hand at it the other day, I can safely say I do not have a future career in doing anything that is airtight. Also, I found out that my gas hose has a leak in it and welding with dirty shielding gas is a nightmare.

Good times...

Sean
 

WFO Speedracer

A lifetime ban is like a lifetime warranty !
Location
Alabama
I need some welding done on my ATV loading ramps , they are fairly thick and it would be fairly hard to mess that up , I will see if I can get him to give me some quick lessons welding up my own stuff and pay him for his time and expertise.
 
Today I fabbed up a 2010+ super jet to sxr 1500 pole conversion bracket. Designed it all in solidworks. The geometry for the pivot I already had designed for my square nose bracket. Changed the width a little to accommodate the stainless hood mounts. Cut it out of 3/8” 6061. There’s stainless brackets that will bolt on to the pole pivot mounts to mount the hood hooks.
72E866FF-A111-41C4-AA4B-8B599027E198.jpeg
A54EB057-7143-4956-9747-481E5EE1FD68.jpeg

A0128C22-AF57-4DF1-BF4D-B2ED780AFD93.jpeg
 

WFO Speedracer

A lifetime ban is like a lifetime warranty !
Location
Alabama
Trailer came in under a VX 1100 with a toasted engine that someone dropped off for free , yes way too little trailer for that kind of weight, so I made it back into what it was built for, I welded all the crossmembers , put a plywood floor on it undercoated the bottom of the floor, stained the top of the floor with exterior stain , built new taillight brackets and repainted it , now it's up for sale on Facebook marketplace.
 

Attachments

  • IMG_20230222_100533365_BURST000_COVER.jpg
    IMG_20230222_100533365_BURST000_COVER.jpg
    263.2 KB · Views: 93
  • IMG_20230223_125657266_BURST002.jpg
    IMG_20230223_125657266_BURST002.jpg
    243 KB · Views: 52

WFO Speedracer

A lifetime ban is like a lifetime warranty !
Location
Alabama
I actually fabbed this up years ago but it has been sitting for years rusty and ugly, I need to make some new adaptors for it , but here is an adjustable PWC rotisserie, I just cleaned it up and painted it, it will never look like this again , once it's in use it gets paint splatters, gelcoat and paint spray everywhere , I just painted it to keep it from rusting in between uses.

The paint was leftover from my last trailer project , I also made some new pipe handles for turning it and I will get new pins for locking everything down later today. Initially I had square tubing running between the two posts but that proved really hard to move the posts and adjust it so I replaced it with hanging door channel which is slightly smaller , then I cut two smaller pieces of channel, those slide into the long piece and take up the slack , to adjust it you just knock the small pieces out adjust it , slide them back in and tighten the locknuts down.
 

Attachments

  • IMG_20230302_071137966_BURST000_COVER.jpg
    IMG_20230302_071137966_BURST000_COVER.jpg
    262.6 KB · Views: 44
Last edited:
I actually fabbed this up years ago but it has been sitting for years rusty and ugly, I need to make some new adaptors for it , but here is an adjustable PWC rotisserie, I just cleaned it up and painted it, it will never look like this again , once it's in use it gets paint splatters, gelcoat and paint spray everywhere , I just painted it to keep it from rusting in between uses.

The paint was leftover from my last trailer project , I also made some new pipe handles for turning it and I will get new pins for locking everything down later today. Initially I had square tubing running between the two posts but that proved really hard to move the posts and adjust it so I replaced it with hanging door channel which is slightly smaller , then I cut two smaller pieces of channel, those slide into the long piece and take up the slack , to adjust it you just knock the small pieces out adjust it , slide them back in and tighten the locknuts down.
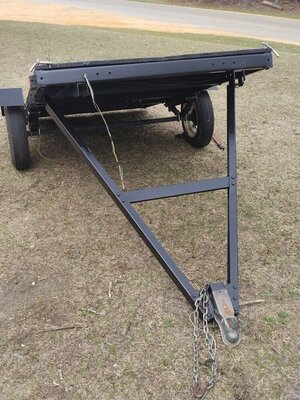
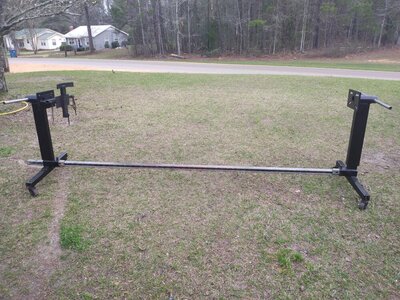
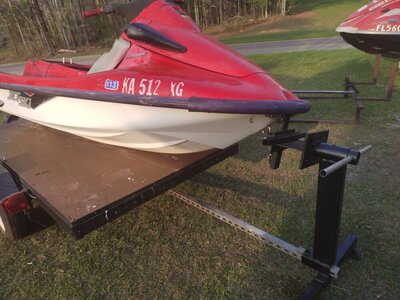
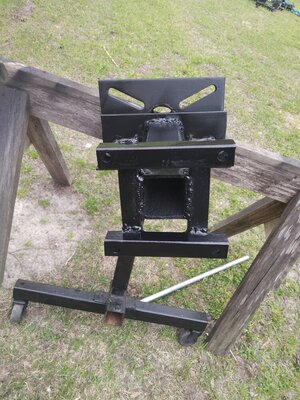
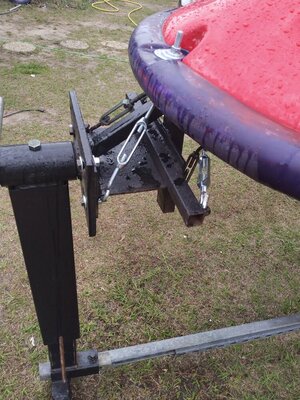
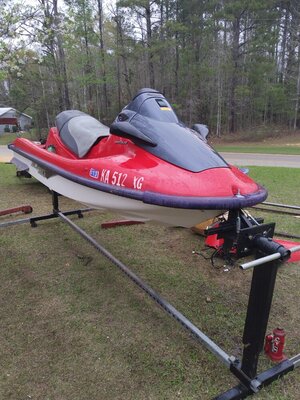
I made one, I def know what I’d do different next time. Good job
 

WFO Speedracer

A lifetime ban is like a lifetime warranty !
Location
Alabama
If I were to upgrade this I would probably add a small hydraulic jack to it with some kind of bracket welded onto the movable pieces , that way you wouldn't need the cherry picker or a hoist to move the movable tubing up and down to adjust the working height, I have an electric hoist on a movable base with with wheels on it so I never did this.
 
If I were to upgrade this I would probably add a small hydraulic jack to it with some kind of bracket welded onto the movable pieces , that way you wouldn't need the cherry picker or a hoist to move the movable tubing up and down to adjust the working height, I have an electric hoist on a movable base with with wheels on it so I never did this.
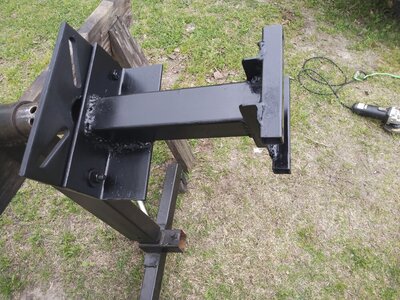
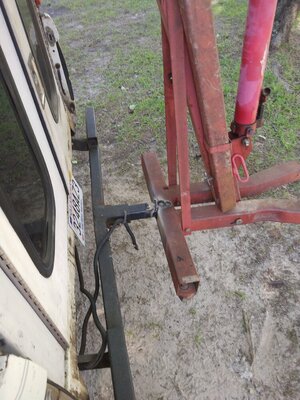
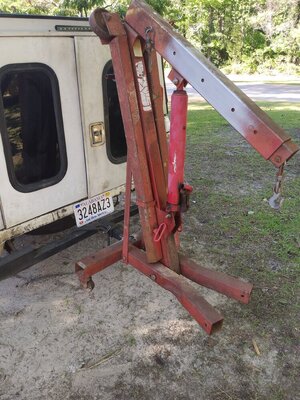
I used spring pins on mine and can move it up and down but it’s a bare hull. The issue I have is slop between the tubes. I should’ve made the holes bigger so the pin engages easier. I would also make the brackets that attach to the ski a little longer to give a little more working room. It’s working but not a polished design. I would also make my degree plate bigger so I could get more locking positions. It would make it easier for sanding as sometimes I’m in between degrees I want.4A6635DC-C1EA-4435-9EAA-6CB32F7A0F1E.jpeg
 

WFO Speedracer

A lifetime ban is like a lifetime warranty !
Location
Alabama
I made two of these because at the time I was working at the Ski Nautique dealer doing paint, gelcoat and FRP repairs, mine was made from two engine stands I cut them loose at the bottom and rewelded them at 90 degrees, I cut off the tube at the top and welded it onto another slightly larger tube so that's how it moves up and down, it has a series of holes through the inner tube that you insert a pin through, that way I retained all the rotational and locking parts of the engine stand, with the parts of the engine stand that were left over I made a couple of roll around stands.

When I left there and opened my own shop I bought one of the rotisseries from them instead of making a new one.
 

WFO Speedracer

A lifetime ban is like a lifetime warranty !
Location
Alabama
I started mounting Big Bertha into the rotisserie today and she is having none of it , it is bending the I beam on the front holder -clamp , honestly I have never had anything this big mounted into it, when this was made the biggest thing out there was a 95 Seadoo GTX, this thing is a behemoth even with the engine out of it.

I will weld some gussets on it tomorrow and round up another couple of turnbuckles as it will take all of it to hold this thing in the stand. I still have to make the holder for the rear that mounts to the pump or most likely to where the pump is bolted onto the hull . On this particular ski honesty I am afraid to try and pull the pump off of the ski.
 

Attachments

  • IMG_20230308_163824644_BURST000_COVER.jpg
    IMG_20230308_163824644_BURST000_COVER.jpg
    153.9 KB · Views: 28
Last edited:

WFO Speedracer

A lifetime ban is like a lifetime warranty !
Location
Alabama
Done and done, Big Bertha brace is installed , I go to pickup the hardware this afternoon.

I used a piece of 2 1/2" square tube, the pump cone slides right into it and it never touches, just bolt it up and go, normally I would attach where the pump mounts to but everything in this pump works and I am not about to screw it up by pulling it off. The bolts are 8mm and they should support it just fine.

The welds are not that pretty but almost everything I do is DC - arc welded, penetration is excellent and it's not going anywhere.
 

Attachments

  • IMG_20230309_133818033_BURST000_COVER.jpg
    IMG_20230309_133818033_BURST000_COVER.jpg
    268.7 KB · Views: 21
  • IMG_20230309_133839049_BURST002.jpg
    IMG_20230309_133839049_BURST002.jpg
    213.5 KB · Views: 27
  • IMG_20230309_133833467_BURST002.jpg
    IMG_20230309_133833467_BURST002.jpg
    258.5 KB · Views: 21

WFO Speedracer

A lifetime ban is like a lifetime warranty !
Location
Alabama
Here is where I finally ended up at, a total of five turnbuckles up front and I added two to the rear since I had them already, I dug up some parts I saved from the hull swap I did a few years back, I much prefer the two tone to the all red paint scheme, I also found a one piece seat, yes it need to be recovered but I prefer the one piece seat and one seat is twice as easy to recover as two .

I also had to add extensions to the lower tubes for stability, I believe they were around three ft, now they are double that length easily.
 

Attachments

  • IMG_20230311_151553473_BURST001.jpg
    IMG_20230311_151553473_BURST001.jpg
    234.1 KB · Views: 20
  • IMG_20230311_151605195_BURST000_COVER.jpg
    IMG_20230311_151605195_BURST000_COVER.jpg
    207.2 KB · Views: 22
  • IMG_20230311_151536709.jpg
    IMG_20230311_151536709.jpg
    237.1 KB · Views: 26

WFO Speedracer

A lifetime ban is like a lifetime warranty !
Location
Alabama
Flipped ,filled , sanded, taped and gelcoated , I shot 300CC's of gelcoat on there, 20% reduction 3% hardener, then sprayed with PVA so it will cure properly.
 

Attachments

  • IMG_20230326_110943416_BURST001.jpg
    IMG_20230326_110943416_BURST001.jpg
    103.6 KB · Views: 35

WFO Speedracer

A lifetime ban is like a lifetime warranty !
Location
Alabama
I use my cherry picker a lot but it's a PITA to move around, I saw this online the other day and I made it happen, I had already replaced most of the bolts with quick pins for easy disassembly , now I just hook it up to the truck and go, also if it's not too heavy I can just back the truck up to it and pick it up still attached to the truck, I have other trucks with class 3 receivers on them, it could pick up much more on one of those , but for something like a jet ski engine this will work perfectly.
 

Attachments

  • IMG_20230503_165832172_BURST000_COVER.jpg
    IMG_20230503_165832172_BURST000_COVER.jpg
    171.3 KB · Views: 24
  • IMG_20230503_165848938_BURST000_COVER.jpg
    IMG_20230503_165848938_BURST000_COVER.jpg
    217.5 KB · Views: 25
Top Bottom