RN surf build

Got my strap plate glassed on today. I shouldn’t have rushed it, but did and there’s a few trapped bubbles in the relief holes. Oh well. I should’ve wet set it, then filled in the grooves with thickened epoxy, then laid my layers over it. I’m going to do one more layer of 7oz over the full width of the tray and then all the tray glass will finally be done. I’m going to then use my epoxy filler and block everything somewhat. I don’t want lumpy turf.
BF42ABA1-E0D4-4F33-8347-0F40B080E497.jpeg
I sanded and did another filler coat on my nose piece.
I then sanded and primed my destroyers. These will get sanded down tomorrow.
7192AB8F-4B58-4C95-8FC8-9B403BFCFD93.jpeg
 
This morning I designed a front foot hold. It’s arched and tapered to fit my foot better. It has height to clear 25mm underpad and turf. I had to split it into 3 parts to fit on my 3D printer. I’m going to use these prints to make a mold and then make the part out of carbon fiber. After seeing the part in the tray, I may just mold it all in. We will see. While that was printing, I did a final layer of 7oz on the tray floor. I then started sanding my primer on the destroyers. This will also be plugs for a mold. I want visual carbon fiber sponsons. I’m planning to make front and rear bumpers with visual carbon as well.
B1B13F27-A092-44D9-8DD6-0D3D6C6E8192.jpeg
C9868FA6-A91B-4785-A4ED-D2F6A066390A.jpeg
854058A6-7F89-4EC8-AF0B-8C0D6AC43910.jpeg
 
Got all my pieces 3D printed. I then superglued them together.
9E1E416C-6491-464A-9C74-470CCB32D5FD.jpeg
I then took some stainless tig rod, heated it up with the torch and then set it into the back of the part. This in my brain, will act like rebar and support the glue joint.
0453C7B0-AAD5-4B74-A469-80E9664A568E.jpeg
I then sanded the print with 60 grit and did a skim coat of bondo all over it. (Dries faster than total fair)
I then shot high build primer over the nose piece and the front foot hold.
I also did a skim coat of total fair epoxy all over the tray floor and sides. I want this to be somewhat smooth to help it looked finished and not a hack job.
C59B13CB-4F0F-484D-9BF1-E33B00745868.jpeg
 
Got the foothold plug sanded down. I then hot glued it to some leftover pink foam board I had. The foam will melt with acetone and other solvents so after claying the seam and waxing the plug I sprayed multiple layers of PVA. Then once that was dry I mixed up some red tooling gel and sprayed on a few coats using a harbor freight cheap gun and a 2.5 tip. C879D096-1FE0-4BED-BCFD-30B46D3C1057.jpeg
PVA applied


3E9B03B8-CB9B-481D-A91D-1CC72793DC54.jpeg
2C8668B0-C997-4F94-983F-F8EB1EE8BFD4.jpeg
 
This morning I threw down another coat of gel. Once that was tacky I did a layer of mat. Ran out of laminating resin and acetone. Got the rough sanding done on the filler I put in the tray. Got a few more spots to take care of and then I can prime. The weather isn’t permitting that this weekend. 9FD4C2AE-CEF7-48BE-BB47-5882721E0E48.jpeg
Last night my B Pipe showed up, and according to a Facebook group, I managed to get the worst looking chamber to ever leave their shop. I put in an email to them, we will see if I spent a grand on a turd or if they make it right. I hope they make it right. I am super let down. It’s rather ironic that a talented welder and welding inspector gets the worst chamber.
74FE84F6-4F40-47C7-88DB-2E811BCBBB56.jpeg
6A7DD270-2774-4CF6-8B39-E79C74B10C0D.jpeg
 
San Diego’s weather is broken lately so progress has been a little slow. The B pipe debacle also got me down. The chamber is on its way back to FP.
Wednesday at work I got an alert from my camera and saw this.
I couldn’t bare to even inspect it until today. It hit the ground so hard it dented and chipped my concrete. Damage to the ski was not too bad. It got a crack on the starboard side of the widetray so I ground out that issue and reglassed it today. I trimmed up my foothold mold, waxed it a bunch of times, and laid up the first part.
8CBE3061-AECB-44B2-9A40-A0A25E53D7F6.jpeg
After all that I got one side of the ski filled with fairing compound under the bondline where the tubbies were. The ski was super wavy here. I’ll block that down tomorrow. I am hoping to have the ski primed completely by the end of the weekend. I’ll need luck.
 
after the ski got shot across the driveway I didn’t look at it for 2 days. Friday I looked it over and it wasn’t looking too bad. On the starboard side portion of the tray there was some cracked glass. It appears that the radius corner of the tray took the brunt of the impact and then hit the side of the tray secondly. The ski hit the concrete so hard it dented and chipped my driveway like I hit it with a sledge hammer. Friday I started the first layup in the foothold mold. I waxed the mold multiple times but forgot to spray PVA. The part is trashed but the mold is salvageable.
Sunday I got all the fairing blocked down on the bottom and sides below the bondline and shot a coat of filler primer. Not bad progress for having the stomach flu for 2 days.
58C5BE54-DF0F-41DE-95D7-CFB9D89F786C.jpeg
81DB1BC0-C259-4C15-AAAD-CB98105704CD.jpeg
 
Went to my local glass supply to pick up some carbon fiber for parts I want to make. Decided to change it up and I did carbon fiber reinforcement in the engine compartment. I still gotta do the bottom and the other side that I did black. I’m happy with it for my first time working with it. I did a layer of 7oz then the carbon.169E7AD7-8924-4B52-B931-09BF248774C4.jpeg
 
Friday I spent the whole day cleaning up the garage. Saturday it rained all day. Sunday I got carbon laid on the other side or the engine bay. I’m laying this fairly dry and once it kicks I’m doing a wet coat. I don’t care about the few extra ounces of resin, I do care about carbon splinters and raw knuckles when working in the engine bay. The extra resin helps to smooth out the texture.
620DB7D7-E37C-420D-A67E-77BF4A505C06.jpeg
This afternoon I got the bottom carbon layer on.
8B6A048C-55E3-4866-BE26-E0B406EF6E21.jpeg
CE709014-39D5-4A06-88AD-EFAEA9DD6730.jpeg
Overall I’m pretty happy with it. It was definitely a learning experience. To help keep the edges from fraying I shot the edges with a light coat of spray adhesive. That trick really helped a lot.
 
Last edited:
I got my side molding in because I don’t like turfed rails. I cut a couple chunks of it and stuck it to the rails where the front bumper will end in preparation for my carbon bumper. Not wanting to make a mold for a one off part I sprayed the front end with PVA. I laid multiple layers of 7oz cloth and a couple layers of carbon. Let that cure, trimmed and sanded the part. I don’t want cut or ground edges on the part so I sprayed it with spray adhesive and wrapped it with another layer of twill. I got that resin soaked and then I used a storage bag and shop vac to keep the edges wrapped. I really need a vacuum pump, but haven’t had any luck finding a used one yet.0E77CC10-C34F-43CD-93C7-6A9B696CA3B1.jpeg
F1A16979-F642-4AB6-999F-DBE93D42C2F4.jpeg
 
Yesterday I laid up a foothold in my mold. I also put another carbon layer on my front bumper because I didn’t like how the twill looked after I got it out of the bag. Then I did more epoxy fairing in the tray area and on the dash. Today I got all that sanded down and shot a coat of primer. I am not happy with the primer as I ran out and have a bunch of thin areas and areas that didn’t get hit.
I sanded down the foothold and then did another coat of epoxy on it. I am going to have the top portion of it visual carbon and the bottom part will be padded and turfed.
4AFAD4B0-396C-4F5A-9F31-B2485A59E4A5.jpeg

Forgot that I never posted the engine bay got completed with carbon, I finished the nose, pole area, and bulkhead this week. I’m grinding any areas with stray fibers and throwing more resin on them.E201E795-E115-46D4-BE38-DE927149E014.jpeg
6CC620CD-7546-42E8-BFB3-7187787E029C.jpeg

8D91CB39-A282-4D08-ACF5-3D2B29BDCAB2.jpeg
 
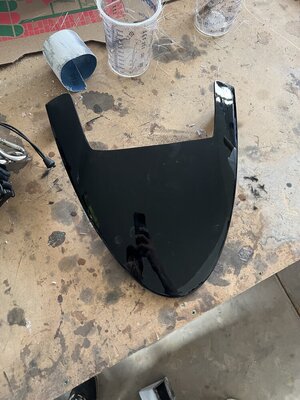
Started to block out the primer last weekend and then I hit a bit of a rut. I ordered a lowered nose piece and it didn’t work out. So I started working on my nose piece that I shaped out of foam and was chasing pinholes. Got it all sanded down and when I went to clean it with acetone, it went into the pinholes down to the foam and started eating the foam. Total waste of a day. I’m a teacher and this week is spring break, you’d think that progress would be fast but I’m struggling for motivation. I have so many different aspects of this project going on that it doesn’t seem like I’m making any progress. So I’m loading up the square and going to havasu in the morning. Maybe some laps will get me amped to finish the round.
Enough of that, today I decided to work on my sponsons. The sponsons that came with the ski were in great condition, but after doing my foothold, nose piece, the bilge reinforcement, and eventually the rear bumpers in visual carbon, I decided I want my sponsons to be made out of carbon as well. So today I got some pieces of sheet metal, tacked them up to make a corner piece and then through bolted the sponson to the sheet. This will give me a nice flange edge to eventually bag my carbon sponsons. Waxed the plug and flange a bunch, sprayed a bunch of PVA, and then used up the remainder of my tooling gel.
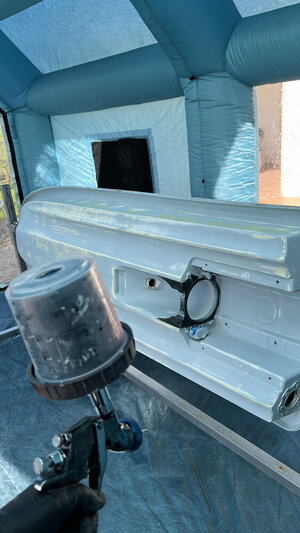
I’m spraying this with the purple harbor freight gun with a 2.5 tip.
That’s all the progress until next week, I’m going to the river. If you see my square with 19 graphics at body beach, come shoot the stuff.
BA21FAD7-DA9D-4B70-9F3B-1123346562DC.jpeg
 
Last edited:
Finally was able to make it out to my supplier for another quart of tooling gel. Sprayed another coat on my sponsons and then laid the first layer of mat.
 

Attachments

  • FAC5103C-6A59-4CB3-B281-66DEBC3A6F7E.jpeg
    FAC5103C-6A59-4CB3-B281-66DEBC3A6F7E.jpeg
    173.2 KB · Views: 25
Got the bottom of the ski all blocked down and shot single stage black on it today. Yesterday I got my new nose piece and shot it black in preparation to cover it in visual carbon.
 

Attachments

  • 5ADF0837-414D-49FE-A521-1922964ECA60.jpeg
    5ADF0837-414D-49FE-A521-1922964ECA60.jpeg
    171.5 KB · Views: 19
  • E95E9976-75A0-41AF-B50D-44ACD8A13F08.jpeg
    E95E9976-75A0-41AF-B50D-44ACD8A13F08.jpeg
    117.3 KB · Views: 17
  • 40046ABB-6547-4BA9-B68F-577F29108A85.jpeg
    40046ABB-6547-4BA9-B68F-577F29108A85.jpeg
    126.7 KB · Views: 15
This afternoon I scuffed the black paint on the nose piece, shot it with spray adhesive and wrapped it with carbon fiber. Idk if this piece will be visual carbon when I get the paint all done but just in case I wanted to wrap it and resin it.
74346D2B-0DE6-41C5-A85E-C6C4A70D1796.jpeg

Once I spread out the resin it went into a vacuum bag. This bag wasn’t sealing good at all. I really need to get a vacuum pump and bagging materials before I lay up my sponsons.
1ABF2C91-9D0E-4466-B399-694C42E42055.jpeg
 
Last week I sanded the epoxy on the carbon nose piece and then focused on getting more layers on my sponson mold. I took the weekend off from working on the ski really. This afternoon I popped the sponson mold, trimmed the edges, sanded the edges and washed all the parting wax off them. These molds came out pretty decent for a garage hack. I also found out that all my carbon parts with this ultra brite surf resin will have a blue hue to them even if I clear coat with 2k clear. Pretty bummed about that but it is what it is. In the shade they look great. In the sun it goes a little blueish. I got another coat of resin on the nose piece where the bag wrinkles had been. The wrinkles don’t allow the epoxy to flow over and smooth out so the cloth texture is prevalent. This coat helps to fill in the cloth. This will get all sanded and then cleared when I paint the ski.
296688FA-F974-4D62-B12D-469767EC8FA6.jpeg
48B452EB-390F-45EA-B621-992A83C162D6.jpeg
 
Top Bottom