My First Standup (2005 Superjet) Build

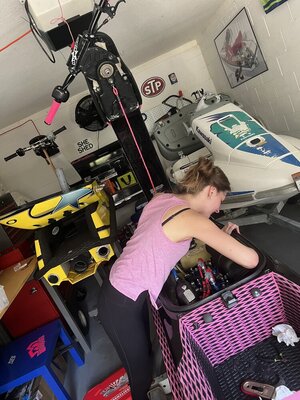
Thought I would commit my first jet ski / Superjet build to the internet for longevity.

Without any previous jet ski knowledge and the assistance of a friend, I checked out and bought a non-running WaveRaider with a mod b pipe that turned out to not be the ski for me. Sold parts and all, and bought a 750-swapped SC in May of 2020. Had a hitch installed on my Prius. Knew I wanted to try standups. Drove myself from Florida to Tennessee at the beginning of June of 2020 with a rental mini van to buy my stock 2005 Superjet. Excited I was able to stand up on it when I water test it.
E40FB8C3-78EE-4FBD-943B-C30BA9C9E676.jpeg0465BC3C-69FF-4A13-845B-53D32A06AA57.jpeg

Picked up cruising around on it pretty quick. Bought another single trailer for it. Knew from internet research that I wanted to have a freestyle standup jet ski. Loved watching videos of the old school freestyle tricks. Started buying parts for it according to more in-depth internet research and recommendations, as well as cosmetic adjustments.
Removed the bulk of the stock graphics that had seen better days, bought new zero degree handlebars, a Cold Fusion throttle lever, and grips. Not too much previous mechanical experience, so a friend assisted with the throttle lever install when I got stuck trying to disconnect my throttle cable. Already was living for these learning experiences and newfound knowledge.
9FCFCD13-BCDE-4590-A6AE-6C52A7647621.jpeg3EAFBC7F-6A56-4EFA-B8B4-16DAF3C76EA4.jpeg

Wanted it to have more power my first week riding it. Three weeks after buying it, I got lucky and was able to order a new limited b pipe for it. Ordered new carbs with adjustable t-screws for tuning, a Hooker 9/15 impeller, and bilge pump kit as well. Paid a friend to help teach me how to put the pipe in the ski properly when I was worried about accidentally cutting corners doing it myself. @augustaf later joined myself and @callmefinch and lent his tools and expertise on the impeller, pipe, and bilge pump.
B8EC6234-6A42-4906-9AE4-58F1BE408E81.jpeg83788BCF-3580-413A-A4BA-B83919F1EF7B.jpeg613D3EBC-FDE7-4E45-9071-EAB308E95033.jpeg034D60EA-9962-4888-9F52-45C239CB8329.jpeg

Was informed on the importance of having a girdled head in conjunction with the aftermarket pipe. Ordered a girdled head kit in the middle of the pipe install, as well as a Worx 201 intake grate. I switched out the stock intake grate for the new one. Set out to install the girdled head kit two months after the pipe install with help from Fred @augustaf and opted to buy one of his very own well-made Zeeltronics 760 ebox kit setups with a lightened flywheel to install at the same time. Went with the charging system rather than total loss as a personal preference with this ski.
AF0D7FC3-4329-4100-B486-11E652058778.jpeg33363AA7-ED1D-4844-ABF4-BBD0433FBA05.jpeg

Reached a happy place with it! Added red plastic retainers to the spark plug boots. Water test and tuning, all was sound and well. Bought an extended ride plate to experiment and try out. I keep it in case I ever want to play with it again, but have kept the ride plate stock thus far. Ordered a flow control valve. Thanks to @JetManiac for quickly shipping parts for this build and providing knowledgeable advice along the way.
 
Had Jettrim make a new chin pad cover for me that I had a local marine upholster who also installed my SC seat cover and did some maintenance work on the foam attach since I was unable to stretch it enough on my own.
E394A1EE-24F0-4206-BC6A-C2B7014ED216.jpeg

Wanted footholds, but didn’t feel confident to attempt them myself on my prized possession. Ordered Wamilton footholds, Hydro-Turf sheets, padding, and took my ski south to @waterfreak to have him do turf and footholds for me with a color scheme idea I had. While my ski was down there, I removed the peeling vinyl wrap that covered my hood and paint it with automotive spray paint and primer. Didn’t turn out too bad, but has chipped quite a bit since.
B41B25E6-E5E6-4A07-AEEF-AA00074E04EE.jpeg
F37DF5F9-C5A9-4D4A-A142-F540B7E1776B.jpeg
E0E312DE-E146-4C86-8730-086D75A12C01.jpeg
B0D4FDB6-DDD3-402D-89A4-78153C9918E2.jpeg

This was about the time, a month and a half after completing the last major mechanical upgrades, that we realized my ski engine had bit the dust after it’s last ride. @augustaf invite me over to diagnose the problem and find a solution. While taking it apart, we identified the culprit.
18E0B1FC-BFA5-4EFF-8B3B-7BA13B94DA6D.jpeg995A2F30-913F-45C2-935B-19638FE5A8B5.jpegFFFB48BE-FBAE-400F-9334-7C867DE811D1.jpeg

Piston broke and shot down metal through the crank and broke the crankcase. Noticed while we were taking the ski apart that, though unrelated, my pipe chamber was rubbing on the engine and leaving quite the dent. Him and I immediately set out to rebuilding my ski together. Attempted honing on the cylinders first before opting to bore a size up. New SBT crankshaft, bored cylinders and a welded crankcase repair done by @Blue, new pistons, etc. Along the way, Fred had some choice ideas for upgrades to my SJ. He bored out the b pipe to 49mm, we replaced the stock reeds with fiberglass ones, drilled and set up the inside in a y-off for a modified version of dual cooling, and the engine came back together perfectly and better than ever had been prior.
327B787A-DAAF-4FB5-81D0-A097742213B7.jpegCD7BC31C-223C-412D-92AD-EB811E88A7EF.jpeg

Water test and all was excellent. I still struggle with the art of tuning skis though.
 
Last edited:
Over the next few weeks, we installed the FCV and limiter rope in preparation for the Daytona Freeride. I also did some pink aesthetic upgrades.
4E132FC8-ECA4-4333-84D0-F55C095CC941.jpeg0FC8787B-DE7D-44B7-8A86-81C0F0A1524E.jpeg7A2244B7-E600-4DA3-AF1B-ACEEFC3E38E8.jpeg

@augustaf and I later worked on doing some repairs to the bottom and lower deck sides of my ski after it ran away while I attempted to load it on the trailer one day and got some new surface scratches. It had always looked less than stellar since purchase underneath, but never posed any noticeable problems. We used marine epoxy. Tuning adjustments seem to have resolved the running away on the trailer issue it had briefly.
EED303A4-8F4D-431B-BCE9-16CB284443C7.jpeg
4506B934-E765-40AB-A868-BDAF913C9B02.jpeg

We later addressed the pipe rubbing situation, which was creeping up again. We ground off the corner of the engine’s bed plate, citing a photo Blue provided me for reference, and partially ground down the sidewall ridges enough to give it clearance.

C07BB53E-A064-42F3-AFF8-4C46315904DD.jpeg
B34DC0D0-1769-4DB2-B600-A197BB7E757E.jpeg7B05C043-20CA-44AB-AF09-804247B86875.jpeg

That last update took place in late May of this year. Have only switched out my faded bilge outlet for a brighter pink billet one since. My next plans of interest are to change out the steering on it for something other than stock. Preferably something to get me a little more forward without having to shorten the stock pole.
 
My next plans of interest are to change out the steering on it for something other than stock. Preferably something to get me a little more forward without having to shorten the stock pole.
Highly recommend a over pivot steering system to get the farthest forwards without shortening the pole. If you went with riser bars you might have to modify the mounting of the stock chinpad. Or you could go with straight bars. The over pivot moves the bars directly over the pivot bolt for maximum steering input. Really changed the handling characteristics of the ski. Ideally the sweet spot on a stock length superjet is with the bars directly over the rear section of the hood seal. The over pivot system will get you the closest with the stock length pole.
 
Highly recommend a over pivot steering system to get the farthest forwards without shortening the pole. If you went with riser bars you might have to modify the mounting of the stock chinpad. Or you could go with straight bars. The over pivot moves the bars directly over the pivot bolt for maximum steering input. Really changed the handling characteristics of the ski. Ideally the sweet spot on a stock length superjet is with the bars directly over the rear section of the hood seal. The over pivot system will get you the closest with the stock length pole.
That’s what I was looking at. Was looking at the Thrust OVP steering with straight bars, but needed to look more into options to modify my stock chin pad to fit the more forward steering or find a different chin pad that would work with it.
 
I love build logs. Not many do them anymore and it’s a shame.
So what was your favorite mod?
Me too! Always like reading and following others, and always wanted to do one of my own.

Overall, the entire rebuild process was my favorite, as it was my favorite to work on. Definitely the most informative and greatest learning opportunity. My ski felt really complete afterward, especially knowing that it was all practically new at that point.

Adding the girdled head and Zeel kit really seemed to wake up the pipe and the rest of the ski though. I felt like I saw the most performance gain from mods after that.
 

waterfreak

I had a vision!
Site Supporter
Vendor Account
Location
s florida
nice build! I'm sure you learned alot from the legend himself!
If you need an OVP steering, hit me up...but you will need a different chinpad to clear the handlebars.
 
Newer updates: A friend helped me out in December with some repairs to my rails and nose, and turfing the rails in the process. Hoping to eventually be able to shadow someone on the turfing process to better learn how to do it myself at some point. YouTube videos on the topic don’t give me a well-rounded enough idea to feel confident in trying it on my own yet.
4ACBB838-5ACD-49B3-9095-ECBAA2164A19.jpeg

Following a persistent issue with it randomly still running away on the trailer after riding, the same friend rebuilt my carbs for me this past week. Multiple failure points, so hoping this might resolve the issue. Installed them and switched out to the pink throttle wheel I’ve had for awhile.
edc95640-6ab4-4228-82ad-1657bba149f8-jpeg.422540

97148D6B-E3B8-4372-AF4A-27BF98809EB8.jpeg

Still need to tune now that they’re on!
 

Attachments

  • EDC95640-6AB4-4228-82AD-1657BBA149F8.jpeg
    EDC95640-6AB4-4228-82AD-1657BBA149F8.jpeg
    193.6 KB · Views: 152
Last edited:
Thanks for sharing you build project! I'm new to this forum and recently bought a superjet myself from a friend. Of course it needs some TLC so we have been working on getting it back to a nice shape. I know you were having a problems with yours running away, mine has done that a couple of times recently so I was wondering how you fixed yours. Any suggestion?
Hey! I actually did. I brought it to a friend local to me and we went through it. My compression was very high for the ski, off the meter, actually. We went through and reworked the carbs, did a bunch of unrelated modifications to it, and when he tuned it and put it back together, it’s running great now! Not sure what your particular case might be, but the popular suggestion for initial diagnosis as I was going through mine is often an air leak somewhere.
 
As mentioned in the previous comment, did give this ski a lot of overdue attention when I brought it to my friend for tuning a few months ago. Ended up with shorter handlebars, true dual cooling, a primer, drilled waterbox, some carb adjustments, and sawed down corners to prevent the regular backsplash. 1FD146C1-61CC-4053-A90C-276EFB5DF2ED.jpeg8C1117F6-F28D-4A92-8372-033F42FCE580.jpegEB72AE40-D1F0-4306-A671-E9957E18F6C6.jpegCAF36B7F-6B56-4721-B338-C730B356D1D3.jpeg

Some of my own cosmetic updates as well. Pulled the remaining OEM graphics in favor of some hot pink details, JetTrim made me a new chin pad cover with more pink on it, and put together a matching scissor stand.
77837F12-4289-4A5F-B51E-1E4EC9772DC8.jpeg
A8ECB362-0D45-4F8B-9D76-EA2591D97D66.jpeg
266BA131-1D2F-4DEC-A5A1-305F7A70367B.jpeg

Really loving it! Always getting better.
 
Top Bottom