Lessons in Fiberglass

Vumad

Super Hero, with a cape!
Location
St. Pete, FL
This is my lessons in fiberglass. A little journal as I go I guess.

Tonight I stopped talking and starting doing. I've started playing with fiberglass. This is the 1st time I've truely worked with fiberglass. In Highschool, I built two planes with 76" wingspans from a pile of balsa wood to a final product covered in monokote ready to fly. The project involved a lot of wood working, filling and shaping. I figure it's a good background for mold making with materials such as foam. However, my only experience with fiberglass was with a single strip using epoxy resin used to re-enforce the wings and a little bumper repair project.

So.. here it goes.
 

Vumad

Super Hero, with a cape!
Location
St. Pete, FL
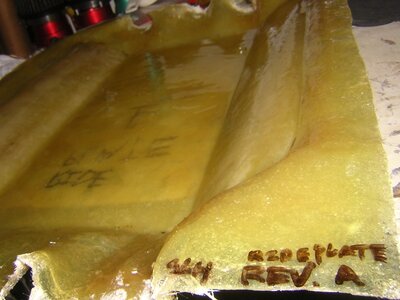
Tonight, I started on my 1st project. I am going to attempt to make a mold from a ride plate, then lift a new ride plate from it. My goal is to get familar with the materials. I chose the materials that were the cheapest, and not neccessarly the best for the job.

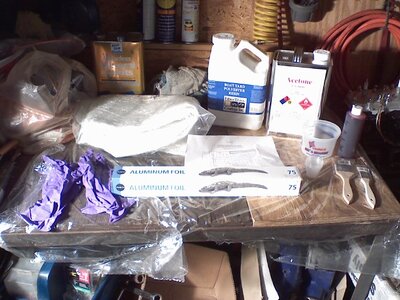
Picture #1 is my materials. I have a yard of 10 oz (iirc) fiberglass mat, a gallon of poly resin, a couple ounces of hardener, a mixing cup that includes measuring for the resin, small measuring cups for the hardener, a 2" brush, a pair of scissors, a pair of gloves, safety goggles, a radio with some jamage playing, a working space covered with plastic, some acetone nearby for emergencies, an extra wide roll of tin foil (not the best option but it's easy and I already had it), an old 4" paint roller (the dried paint had hardened so I used it as my squeege in the absence of a better item)

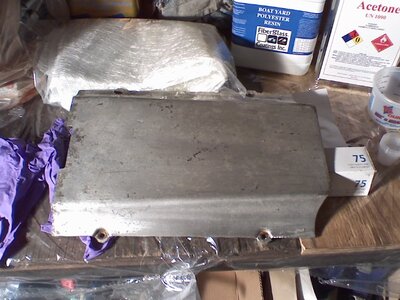
Picture #2 is my plug. My plug is a X2 ride plate by PJS. I chose this because it is a very simple plug. It has some curves but it is mostly flat. It should provide a simple 1st project. In addition, it is something I can use on my ski, so I can test the results of my work. I also don't want to cut a good ride plate, so if this works, i can go d-cut without cutting.

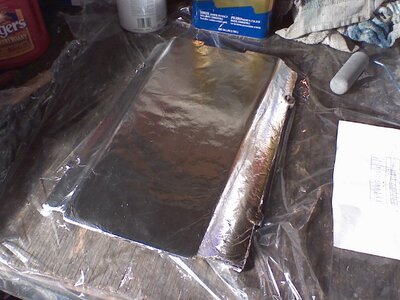
Picture #3 is my plug covered with aluminum foil. Yes, I know, this is the halfassed way to pull a plug. I should use a wax and a releasing compound, but frankly, that's too much work. I don't need a perfect finished product. I'm not attempting to win a beauty pagent with this thing. I just want to end up with a useable final product.

So, from here on, I was the only person arround and I couldn't risk getting my phone dirty by taking pictures. So, no more pictures...

I cut a piece of fiberglass to slightly larger than what I needed. I then mixed 8 ounces of resin with 3cc of hardener (somewhere in the middle of the two desired amounts of hardener, 1% and 1.25%). I removed my safety glasses after I was done mixing the resin. I used my 2" brush and put a thin layer of resin on the plug. Thin enough that it wasn't runny, but thick enough that there was something to absorb into the mat when I put it down. Then I layed the mat onto the plug and used my roller to push the mat down onto the plug. This made it stick to the plug, and started forcing the resin into the cloth. I then used my 2" brush and dabbed the mat lightly. I was told that stroking the mat pulls the fibers, and dabbing is the reccomended method. I used a little resin at a time on my brush, covering the whole plug. Then I used my roller to make sure the resin soaked in. I repeated this process until all dry areas were covered and the layer of mat became transparent. I realized at this point I had only used half of my resin, so I cut another piece of cloth and put on a second layer. I just did the same thing for the second layer as the 1st, except for adding the inital resin onto the plug, because the 1st layer was still wet and I didn't need to put more onto the plug.

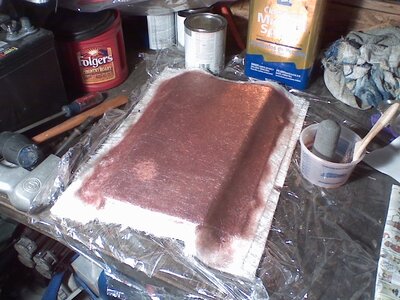
Pic #4 is my finished result. I only did two layers tonight. I understand you shouldn't lay more than 1/8" at a time to prevent heat warpage. I could probably have laid 4 layers following this rule, but I want to see how well it dries before I throw more materials at it.

Until tomorrow...

PS. It was 62 degress outside. Not ideal temperature for resin to dry. This gave me a very long pot life which was nice for my 1st go arround.
 

Attachments

  • 0125082332.jpg
    0125082332.jpg
    130.6 KB · Views: 112
  • 0125082332a.jpg
    0125082332a.jpg
    114.8 KB · Views: 118
  • 0125082343.jpg
    0125082343.jpg
    117.6 KB · Views: 167
  • 0126080017.jpg
    0126080017.jpg
    140.2 KB · Views: 218
Last edited:

WaveDemon

Not Dead - Notable Member
Location
Hell, Florida
good work.

2 suggestions:

  • it would be a good idea to wet out a little more of the cloth and not stop right at the edge of the part.
  • that is going to be a really flimsy mold. you need more layers, you get a better bond laying up your layers wet.
 
Location
dfw
Your mold will need to be at least 1/4 inch thick for stability. Next time use good plaster like Ultracal30 or Hydracal for the mold and PVA for release.
 

Vumad

Super Hero, with a cape!
Location
St. Pete, FL
I just went out and checked my mold. It's nice and hard. I'm happy with it. I'm not goign to lift it off yet. I'm going to toss on a few more layers before I pull it to make sure it's nice and sturdy.

good work.

2 suggestions:

  • it would be a good idea to wet out a little more of the cloth and not stop right at the edge of the part.
  • that is going to be a really flimsy mold. you need more layers, you get a better bond laying up your layers wet.

Thanks. I realized after I was done that I should have made it wider. Good tip! Maybe when I throw another layer on, I'll wet down the edges.

I was planning on putting on more layers. I only did 2 because I didn't want to waste materials. It was my 1st time working with poly resin and I wanted to make sure it was going to set correctly. It did! I will add more layers before I pull the mold. I will definatly make sure I lay up more layers at one time when i make the actual part.

Your mold will need to be at least 1/4 inch thick for stability. Next time use good plaster like Ultracal30 or Hydracal for the mold and PVA for release.

I know I should use PVA to release the mold. I used tin foil mainly because I don't have a good way to spray the PVA. I'll use PVA later, but for right now, I'm just interested in properly mixing and appling the resin to the glass.

Good tip on the plater though. I hadn't thought of using plaster to make a mold.
 

Mouthfulloflake

ISJWTA member #2
Location
NW Arkansas
looks good!

always lay up multiple layers when its wet, it will bond better.

also, Ive used plastic wrap, and packaging tap, sprayed with PAM cooking oil for mold release too, it works well.
 
Polyester resin is ok for building molds and tooling.You do not want to use it for your ski imo.Polyester is a cheap resin that will breakdown and has poor bonding characteristics.
Vinyl ester has better bonding and still cost effective.
Epoxy resin is the way to go for your layup,strong and it bonds well.
Get some mold release for your mold.Apply it several times just like car wax,Apply let dry then buff.
 

WFO Speedracer

A lifetime ban is like a lifetime warranty !
Location
Alabama
Typically you would use pva and a mold release wax on top of that ,yes make the mold much wider,you will have to trim the part you pull from the mold no matter what,looking good so far and you are approaching this in the right way.
 

Crab

thanks darin...noswad!
Location
Seattle
Mike, one trick I read about when making the mold was to mix the first batch of resin with cabosil to a paste like consistency and spread it on the plug, then apply the glass mat, and follow with layers and resin. The thickened layer adds a gelcoat like first coat to the mold that improves the quality of the inner surface of the mold for pulling parts.
 
Last edited:

WFO Speedracer

A lifetime ban is like a lifetime warranty !
Location
Alabama
Of course if you want a really slick mold you pva it then put on mold release then spray over it with tooling gelcoat,then fiberglass over that,the mold will have the nice finish you are looking for and the tooling gelcoat is tough so you can pull multiple parts off of the mold.
 

thegoldenboy

RN Surgery... soon
Location
Toronto
Lay up as many layers as you need wet. Allowing it to dry and than sanding it is th elong way to go.

Better layup when all done together.

Have your pieces precut, wet out 1 at a time and keep laying on top of eachother. Roll it out in between with a glass roller.

You`ll see better results.
 

WaveDemon

Not Dead - Notable Member
Location
Hell, Florida
Of course if you want a really slick mold you pva it then put on mold release then spray over it with tooling gelcoat,then fiberglass over that,the mold will have the nice finish you are looking for and the tooling gelcoat is tough so you can pull multiple parts off of the mold.
+1

except I start with wax then spray pva as my mold release.
 

stanton

High on jetskis.
Location
atascadero,ca
this thread encouraged me to make a mold.
i got cheap poly resin for it and then once i popped it and sanded out any bumps rounded edges mixed up a couple pumps of west system and glossed the mold surface.
now i gotta get some glass and carbon
 

Attachments

  • DSCN2606.JPG
    DSCN2606.JPG
    309.9 KB · Views: 117

tom21

havin fun
Location
clearwater FL
we all have work to do to feed our families. get one and we can cry in our generic brand N/A beers together about it.:sad2:

on the bright side you will have your bound hinge aftermarket fiberglass x-2 hull done in no time!!!!!
 

Crab

thanks darin...noswad!
Location
Seattle
we all have work to do to feed our families. get one and we can cry in our generic brand N/A beers together about it.:sad2:

on the bright side you will have your bound hinge aftermarket fiberglass x-2 hull done in no time!!!!!
It may be underway as we speak.:sneaky:
 

Attachments

  • im_009b.jpg
    im_009b.jpg
    19.7 KB · Views: 77
Top Bottom