Now to do this we need the following tools:
Utility Knife
Razor Scraper
Polarizing Film (peel and stick style)
Mirror Foil/Aluminum paper (DOES NOT WORK its paper… and will shred eventually) instead get silver reflective foil tape from a hardware store
Clear epoxy
Marine grade caulk
90% or higher isopropyl alcohol (you can use this as much as you like on the motherboard as it’s safe for electronics and dries quickly)
Microfiber cloth
Optional:
New sticker off eBay, $20 for most Yamaha gauge styles. (this is a requirement if you have a damaged button) yes… Yamaha’s cutting edge water prevention technique is a sticker that can rip and some rubber backing on the internals… if your button doesnt work after repair attempts just fill it in with marine caulk to prevent water intrusion then apply the sticker over it once it dries to hide it.
3M headlight restoration kit for restoring the external plastic (ONLY get the one that has the clear coat wipes in it)
PlastX to buff after finishing with the restoration kit.
Now unfortunately to open these we need to snap about half of the sides in order to get a spot to open it up. (We’ll repair this later with clear epoxy and double seal it with marine caulk after)
Bend one of the sides of the main gauge or use a dremel to cut it off in order to get a spot to separate the gauge.
You do NOT need to be worried about damaging the board or any wires as they’re protected by the second shell.
You can see a video showing the breakdown of the gauge here:
Now for some gauges it appears there’s a way to separate it without snapping the edge off but, the seal was impossible to break on the gauge I had without snapping it off.
Once you snap off a side you’ll see a seam. Use a utility knife to cut at this repeatedly until you start separating the layers.
After this use pry tools (plastic spudgers etc.) and repeat the cutting process until the gauge opens up.
Once opened up you will probably have the rusted mess like I did. (There are four 1.0 x 10mm screws holding the board to the gauge)
Flip the board over and bend the 3 bottom tabs of the metal plate to remove it. (This is only held on by pressure so pull it towards the 2 larger tabs at the top until it separates)
Once separated you will have a layer of glass.
This layer of glass is assembled as follows.
Polarizing film >> glass >> polarizing film >> mirror foil/aluminum paper
Now to replace the mirror foil and polarizing films use a utility knife on the corner of the glass until it peels. This will leave a ton of residue so use a Razor scraper to remove this.
Once the old residue is removed cut your polarizing films and mirror foil into the old shape and apply in the same order that you removed. Make sure to clean the glass with 90% or higher isopropyl alcohol and a microfiber towel as it’ll help prevent the new polarizing films from bubbling up. (If you don’t have mirror foil you can use a sheet of printer paper to test the gauge… NEVER use this permanently as if it gets wet the gauge will become unreadable)
You will likely need a couple attempts at applying the polarizing films as they tend to bubble up. (Same idea as applying a screen protector except it’s got glue on the back of it making it 10x worse)
Finally snap the gauge back together the same way you took it apart making sure to bend the 3 tabs of the plate back into place. (If you can’t read the gauge now you need to double check the metal tabs and sizing of your polarizing films and mirror foil) This gauge functions off of pressure between the layers so not having the pressure correct will cause you issues.
Once back together use clear epoxy to reattach the plastic siding you had to remove and once dried use marine caulk to seal up the gauge.
Before:

Initial sanding/2k clear on outside:

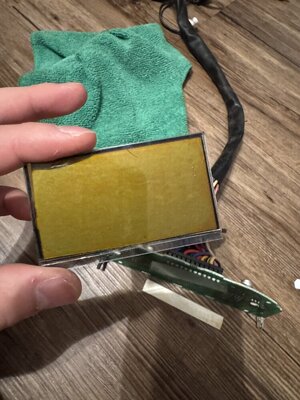
Internals:

Bad initial test:

Bad polarizing films and aluminum/mirror sheet:

End result with paper for testing instead of the mirror/aluminum sheet (need to buy this today):

Edit:
Found out the best way to apply the foil tape is 1 layer sticky side down on the white plastic backing…

and the 2nd layer sticky side down on the rear polarizer.

You should end up with this:

Final result after everything was put back together is below this post.
Extremely important note:
When cutting out the polarizer make sure to start to peel it prior to cutting. If you cut the polarizer in the wrong orientation you will have a blue unusable backing and will need to cut another piece out.
Also when applying the polarizer use this method in the video with a plastic screen protector applicator wedge. This will prevent the bubbles from forming as long as you’re pressing firmly down and paying attention to any bubbles that form.