90 & 96 SJ Complete Rebuilds with home porting and painting to come

adet16v

No like winter
Both of these skis are in need of quite a bit of work. I acquired them both in the last year with plans of major overhaul in the winter and here I am...
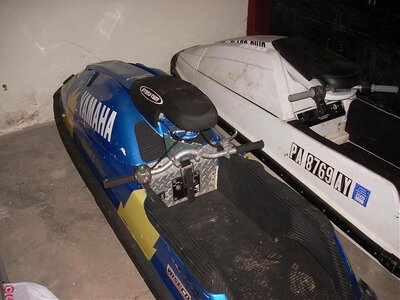
96 RN
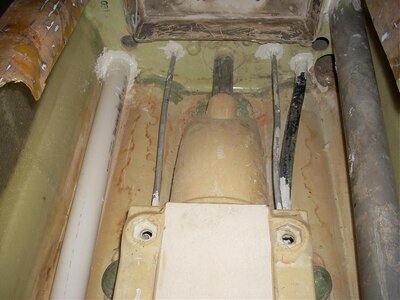
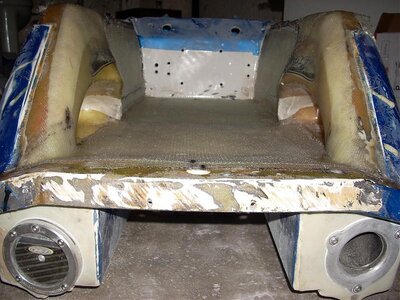
This skis been through some serious abuse. Its cracked at several locations mostly resulting from a drypipe bouncing around at the hoodlip and pancaked landings. The foam was completely soaked with standing water from leaks around the thru-hull for the steering cable, scupper, exhaust and footholds. Several inserts need to be replaced (some already done).

My plans are to restore the structural integrity and buoyancy of the hull including new footholds, de-foam/re-foam and reinforcing the bondline and hoodlip areas for further abuse. Then it will receive a fresh coat of paint and new turf.

Motor has not been fully decided upon as of yet, mild mods as reliability is my overall goal for both skis.

90 SN
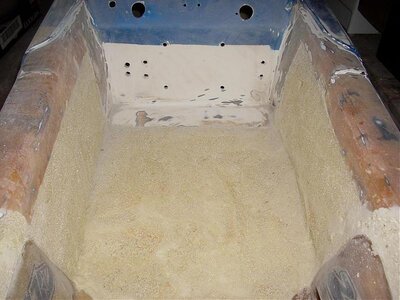
This ski has also seen a bit of abuse. This summer the rotted SMC was allowing water in faster than the single 500GPH bilge pump could expell it. I also broke the handle pole and ripped off the nose piece learning to do nose stabs. I began sanding the top deck this past weekend and counted 4 coats of paint... white, fluorescent yellow, fluorescent pink and finally white again. Fortunately as far as I can tell, the foam in this ski is still dry.

This ski will be getting a RN pole, some type of hood mod and a homemade nosepiece that won't rip off. It will also receive footholds, turf and MUCH needed paint.

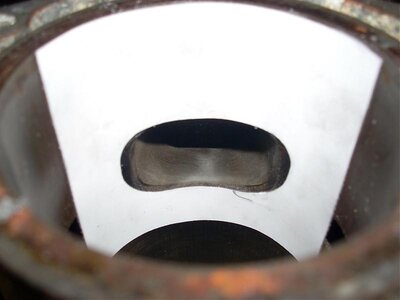
Powerplant will be a bone stock 701 61x which will replace the 650 motor from 1990 that is still on its ORIGINAL BORE.
 

Attachments

  • New Hull.jpg
    New Hull.jpg
    120.9 KB · Views: 64
  • 12-15-07 001A.jpg
    12-15-07 001A.jpg
    71.7 KB · Views: 51
  • 12-15-07 003.jpg
    12-15-07 003.jpg
    59.2 KB · Views: 41
Last edited:

adet16v

No like winter
RN Progress

I have de-foamed the ski and removed the exhaust and scupper tubes.

I filled the bondline with foam to create a transition between the top and bottom decks for overlaying reinforcement.

Arrows in pictures are pointing out random cracks.

Vinyls have been removed to prep for sanding (everyones favorite).

SN Progress
The topdeck has been stripped as well as the oem turf.
 

Attachments

  • 1-3-08 007.jpg
    1-3-08 007.jpg
    103.9 KB · Views: 64
  • 1-3-08 005.jpg
    1-3-08 005.jpg
    81.7 KB · Views: 59
  • 1-3-08 013.jpg
    1-3-08 013.jpg
    57.4 KB · Views: 79
  • 1-3-08 003.jpg
    1-3-08 003.jpg
    77.4 KB · Views: 60

adet16v

No like winter
RN Progress

Reinforcing is done. Time to repair some cracks and re-foam. My new footholds arrived as well.

I chose to fill the bondline with foam, then laid a 7" wide strip of 17oz biax and then a 10" wide strip of biax both front and rear of the bulk head.
 

Attachments

  • RN-018.jpg
    RN-018.jpg
    52.4 KB · Views: 64
  • RN-001.jpg
    RN-001.jpg
    66.1 KB · Views: 67
  • RN-010.jpg
    RN-010.jpg
    79.9 KB · Views: 57

adet16v

No like winter
Update

Time for an update.

Sealed all thru-hull lines, re-sealed exhaust, new scupper tube and bolted both the scupper and exhaust firmly into place with stainless bolts. Everything has been carefully sealed with 3M5200.

Ive noticed a lot of skis developing holes at the bottom corners of the transom from being drug occasionally or frequently by the nose... as a precaution on the inside I filled this area with filler in case it does rub through in this location in the future. It should remain sealed off and allow me to catch it long before it springs a leak.

I made some makeshift cardboard formwork to avoid wasting a ton of foam and poured 1 cup at a time....:fing02:
 

Attachments

  • SJ Round 015.jpg
    SJ Round 015.jpg
    68.9 KB · Views: 59
  • SJ Round 2 017.jpg
    SJ Round 2 017.jpg
    82.3 KB · Views: 82
  • SJ Round 2 012.jpg
    SJ Round 2 012.jpg
    59.9 KB · Views: 50
  • SJ Round 2 002.jpg
    SJ Round 2 002.jpg
    65.2 KB · Views: 60

adet16v

No like winter
I've done a little home porting to my 61x cylinder. Its a variation of the original sport port template. I picked up a blank 8.5 x 11 magnet sheet and cut out a template. Took it to 67% of what ill be an 82.0 mm bore. Used a dremel and flex shaft. Fortunately the transfers and boost ports were already matched pretty well before I got to it.

Now its off for a bore/hone.
 

Attachments

  • SJ Round 2 023.jpg
    SJ Round 2 023.jpg
    29.4 KB · Views: 50
  • SJ Round 2 021.jpg
    SJ Round 2 021.jpg
    42.4 KB · Views: 50
  • SJ Round 2 019.jpg
    SJ Round 2 019.jpg
    132.2 KB · Views: 49

adet16v

No like winter
I trashed the pieces of my tray that I cut out to defoam. Instead I'm going to shape the foam how it should be and then glass over the foam. I'm going to use some 410 fairing filler to fill any uneven spots and may even work a light coat of it on top of the foam before laying glass to fill all the little voids. I've also got a new set of 24-7 universals stuck in there.

I also re-sealed the pump inserts with 3M5200 and another board member was nice enough to time sert the stripped inserts for me (thanks Alex). To seal the inserts I put them in as shown then threaded the bolts up to the top of the insert and globbed some 3M5200 on top. After it set up I backed the bolts out.

I picked up a set of Surf jet Louies and have them mounted. I need to fill over top of the bolt heads that I ground down and finish fairing them in.

overall its coming along nicely. Ive got a lot of work left to do and am already itching to ride...
 

Attachments

  • SJ Round 001.jpg
    SJ Round 001.jpg
    90.8 KB · Views: 70
  • SJ Round 004.jpg
    SJ Round 004.jpg
    70.5 KB · Views: 61
  • SJ Round 005.jpg
    SJ Round 005.jpg
    77.5 KB · Views: 62
  • SJ Round 011.jpg
    SJ Round 011.jpg
    38 KB · Views: 46
  • SJ Round 017.jpg
    SJ Round 017.jpg
    62.8 KB · Views: 50

douglee25

m3booooy
Location
South Jersey
Lookin' good as usual bro! I wouldn't even bother with the fairing filler on the foam. The glass will fill it in and finally with the turf on top, you'll never notice it.

Doug
 

adet16v

No like winter
Lookin' good as usual bro! I wouldn't even bother with the fairing filler on the foam. The glass will fill it in and finally with the turf on top, you'll never notice it.

Doug

True, most likely I'll just use it on the uneven areas...

This build could use some 0* black handlebars, don't you think?

You doing any work on your SN?
 

surfjetlouie

R.I.P. 11/27/2008
I trashed the pieces of my tray that I cut out to defoam. Instead I'm going to shape the foam how it should be and then glass over the foam. I'm going to use some 410 fairing filler to fill any uneven spots and may even work a light coat of it on top of the foam before laying glass to fill all the little voids. I've also got a new set of 24-7 universals stuck in there.

I also re-sealed the pump inserts with 3M5200 and another board member was nice enough to time sert the stripped inserts for me (thanks Alex). To seal the inserts I put them in as shown then threaded the bolts up to the top of the insert and globbed some 3M5200 on top. After it set up I backed the bolts out.

I picked up a set of Surf jet Louies and have them mounted. I need to fill over top of the bolt heads that I ground down and finish fairing them in.

overall its coming along nicely. Ive got a lot of work left to do and am already itching to ride...

Looks good. I like the way you did refoam before closing the tray and gunwale.
Keep on the good work.
 

douglee25

m3booooy
Location
South Jersey
True, most likely I'll just use it on the uneven areas...

This build could use some 0* black handlebars, don't you think?

You doing any work on your SN?


If you're speaking of the bars I owe you, they're purple, not black :biggrin:

I haven't done a damn thing to my ski this winter. In fact, I haven't even been in the garage much since before Xmas. I've been traveling so much for work and still trying to secure another boat for the summer that it's been sucking up my time.

I will get on the bar deal for you shortly.

Doug
 

oxnard111

Creative RE Purchasing
Dude, that work looks awesome. I too like that you refoam before closing the tray back up.

When you say you "re sealed the pump inserts" do you mean that you re installed them with 5200? Or that you sealed the top of the so that water will not intrude through them again. I'm having trouble understanding since you show the bolts coming out the tray side.
 

adet16v

No like winter
Dude, that work looks awesome. I too like that you refoam before closing the tray back up.

Thank you

When you say you "re sealed the pump inserts" do you mean that you re installed them with 5200? Or that you sealed the top of the so that water will not intrude through them again. I'm having trouble understanding since you show the bolts coming out the tray side.

Maybe it should just read 'sealed' as they were never really sealed from the factory...

what I did was coat the recess in the fiberglass with 3M5200 and then put the insert into the recess (had bolts threaded in backwards as shown in picture to push the inserts in without getting 5200 all over my fingers...) thus sealing between the fiberglass and brass insert.

Then I threaded the bolts in correctly from the underside until the bolt was flush or just above the top of the mount in the tray. Then I put a health proportion of 5200 on top of the insert. The bolt effectlive kept the 5200 from funneling out the insert until it cured. Then just backed the bolts out.
 

oxnard111

Creative RE Purchasing
Thank you


Maybe it should just read 'sealed' as they were never really sealed from the factory...

what I did was coat the recess in the fiberglass with 3M5200 and then put the insert into the recess (had bolts threaded in backwards as shown in picture to push the inserts in without getting 5200 all over my fingers...) thus sealing between the fiberglass and brass insert.

Then I threaded the bolts in correctly from the underside until the bolt was flush or just above the top of the mount in the tray. Then I put a health proportion of 5200 on top of the insert. The bolt effectlive kept the 5200 from funneling out the insert until it cured. Then just backed the bolts out.
i figured as much, but wanted to make sure. I wondered how people sealed those up properly.

i squirt some rtv silicone into the holes from the underneath to seal it up the best I can on every new (new to me) superjet I get.
 

adet16v

No like winter
Dude, that work looks awesome. I too like that you refoam before closing the tray back up.

Thank you

When you say you "re sealed the pump inserts" do you mean that you re installed them with 5200? Or that you sealed the top of the so that water will not intrude through them again. I'm having trouble understanding since you show the bolts coming out the tray side.

Maybe it should just read 'sealed' as they were never really sealed from the factory...

what I did was coat the recess in the fiberglass with 3M5200 and then put the insert into the recess (had bolts threaded in backwards as shown in picture to push the inserts in without getting 5200 all over my fingers...) thus sealing between the fiberglass and brass insert.

Then I threaded the bolts in correctly from the underside until the bolt was flush or just above the top of the mount in the tray. Then I put a health proportion of 5200 on top of the insert. The bolt effectlive kept the 5200 from funneling out the insert until it cured. Then just backed the bolts out.
 

adet16v

No like winter
Looks good. I like the way you did refoam before closing the tray and gunwale.
Keep on the good work.

Thanks, your sponsons came out great. I used a piece of 170z biax sandwiched in between the hull and back of the sponson when I mounted. I brushed a good bit of resin into the foam and then wet the cloth up. As I tightened the bolts up I could see resin oozing out around the edges of the sponson. I thought this way worked really well.

Also, I found a really easy way to line them up for mounting. turn the hull on it's side, turn out all the lights and put a flashlight inside the hull pointing up where the sponson would go. Trace over the first rib in front of the bulk head on the outside of the hull with a sharpie. Then measure back 3.5" from that point and that will put you right at 1" in front of the face of the bulkhead. :smoker:

EDIT: Note, not sure if this method works on SN's as ribs could be in a different location?
 
Last edited:

adet16v

No like winter
If you're speaking of the bars I owe you, they're purple, not black :biggrin:

I haven't done a damn thing to my ski this winter. In fact, I haven't even been in the garage much since before Xmas. I've been traveling so much for work and still trying to secure another boat for the summer that it's been sucking up my time.

I will get on the bar deal for you shortly.

Doug

No worries, I have a spare set of stockers still. I'll get them when we hit the water in April. I'm shooting for mid april by the way... I'll keep you updated on my progress.
 

adet16v

No like winter
Ski is coming along great, maybe you can make it down to the beach this year.

Yes we are definitely planning on it. I didn't go once last year... need to make up for some lost time.

I got the tray glassed in last night. All in all I think it came out really well. I used some filler to fill in some of the uneven spots and fair some of the transitions around the footholds and above the transom above the pump cavity where I had cut the tray out.

I measured the original thickness of the oem tray to be about .125". I laid 3 layers of 1708 biaxial down on the tray and the sides (each about .394" dry) and overlapped all the corners to 5 sheets thickness for 2"+/- on either side of the corners. I think that should be pretty sturdy, esp between the footholds as the glass is laid directly on the roof of the pump cavity and only spans the 3" or so gap between that and the footholds. The rear half of the tray is the spot that takes the abuse...

Anyone else glassing their trays up like this? How thick or how many layers did you use?

Gotta give the old squarenose some love :icon16:. I cut out for the footholds last night.
 

Attachments

  • SJ Round 003.jpg
    SJ Round 003.jpg
    79.6 KB · Views: 45
  • SJ Round 012.jpg
    SJ Round 012.jpg
    78.4 KB · Views: 63
  • SJ Round 014.jpg
    SJ Round 014.jpg
    92.5 KB · Views: 40
  • SJ Round 021.jpg
    SJ Round 021.jpg
    66.8 KB · Views: 53
  • SJ Round 002.jpg
    SJ Round 002.jpg
    56.2 KB · Views: 51
Top Bottom