Vumad
Super Hero, with a cape!
- Location
- St. Pete, FL
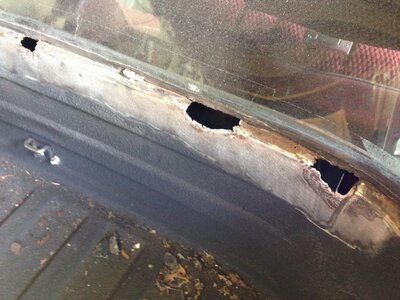
My dad has a 1984 el camino. He went on vacation and came home to find standing water inside his car. He started exploring by poking around with a screw driver and found this. I encouraged him to take it to a legit body shop to be rewelded with metal, but it was going to be extremely expensive, so he asked me to patch it.

I started out with a putty knife and a wire brush just exploring the situation. I found that the holes were much larger than they appeared. A previous owner had filled the holes with rubber cement. This is after the soft stuff was removed.

I then went to cleaning it up and prep. I used a wire cup brush on an angled die grinder to get to bare metal. Then I used some light da work to scuff the metal. Next I cleaned up the sharp edges with a disk on my die grinder. Finally I prepped with acetone.

The window ledge is backed by a channel so there is no access to this area from inside the car. I did have 2 3x3 openings on each side so I was able to create a backing with eps foam. The middle area was about 2 feet from the closest opening, so for that I drilled a hole in the piece of eps, put a bunch of knots in some yarn, got it into place with a grabber, and tied with up with light pressure.

Next I patched the hole. I cut 6oz cloth the same shape as the hole, then covered it with epoxy putty. All resin in this job was 3:1 laminating epoxy. All the filler was made with the same resin mixed 70/30 microspheres and cabosil. (Note: microspheres leave pin holes, so it's not the best mix on painted surfaces, but my dad intends to re-rhino-line this area so it doesn't matter. Microspheres sand easier).

I then took it down to flush with the car. I first hit it with the die grinder disc to take down the bulk, then block sanded it flush with the metal.

The preceding work filled the hole but did not crate any substantial strength. That work was covered with a 6oz cloth to reinforce the repair.

And then covered with putty.

Then feathered into the metal.

I started out with a putty knife and a wire brush just exploring the situation. I found that the holes were much larger than they appeared. A previous owner had filled the holes with rubber cement. This is after the soft stuff was removed.
I then went to cleaning it up and prep. I used a wire cup brush on an angled die grinder to get to bare metal. Then I used some light da work to scuff the metal. Next I cleaned up the sharp edges with a disk on my die grinder. Finally I prepped with acetone.
The window ledge is backed by a channel so there is no access to this area from inside the car. I did have 2 3x3 openings on each side so I was able to create a backing with eps foam. The middle area was about 2 feet from the closest opening, so for that I drilled a hole in the piece of eps, put a bunch of knots in some yarn, got it into place with a grabber, and tied with up with light pressure.
Next I patched the hole. I cut 6oz cloth the same shape as the hole, then covered it with epoxy putty. All resin in this job was 3:1 laminating epoxy. All the filler was made with the same resin mixed 70/30 microspheres and cabosil. (Note: microspheres leave pin holes, so it's not the best mix on painted surfaces, but my dad intends to re-rhino-line this area so it doesn't matter. Microspheres sand easier).
I then took it down to flush with the car. I first hit it with the die grinder disc to take down the bulk, then block sanded it flush with the metal.
The preceding work filled the hole but did not crate any substantial strength. That work was covered with a 6oz cloth to reinforce the repair.
And then covered with putty.
Then feathered into the metal.