My new hull

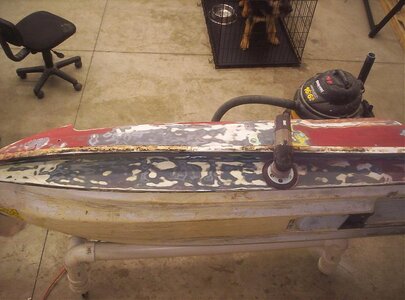
Originally my buddy and I bought this off of Harrison to be my back up and also my buddy's ski for when he felt good enough to ride. But like usual plans change and now I am just going to use this hull as my primary one and sell the other one. I got it in kinda rough shape but non the less I finally got to work on it last weekend. Having to drive home from school on the weekends just to work on it kind of stinks but I enjoy skis way too much to stay in my dorm room.

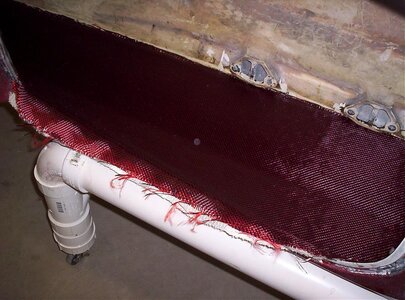
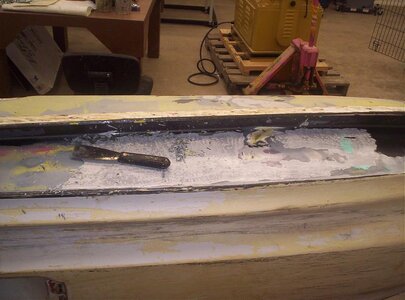
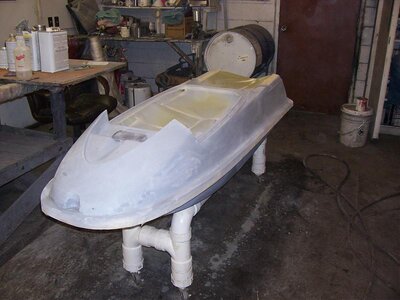
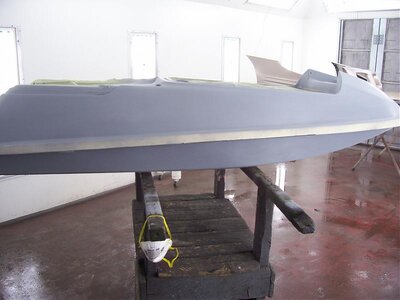
First job was to tackle the broken off nose. It would have been much easier but for some obsurb reason my wonderful father threw away the old nose thinking that the hull was junk. So this past weekend I built a new nose from scratch and started getting it ready for reinforcing.
 

Attachments

  • 101_1247.jpg
    101_1247.jpg
    56.7 KB · Views: 126
  • 101_1255.jpg
    101_1255.jpg
    62.4 KB · Views: 163
  • 101_1276.jpg
    101_1276.jpg
    68.3 KB · Views: 153
  • front2.jpg
    front2.jpg
    66.1 KB · Views: 150
Decided to go ahead and use 8 lb foam in the bond line instead of epoxy with filler. I had never used foam before and I was surprised at how hard it was once it was set up and I had sanded it down. Also I decided to go with a carbon/kevlar cloth just to do something different and because of looks.
 

Attachments

  • 101_1269.jpg
    101_1269.jpg
    59.7 KB · Views: 84
  • 101_1270.jpg
    101_1270.jpg
    53.3 KB · Views: 91
  • 101_1273.jpg
    101_1273.jpg
    41.2 KB · Views: 147
  • 101_1275.jpg
    101_1275.jpg
    67.4 KB · Views: 134

Big Kahuna

Administrator
Location
Tuscaloosa, AL
How many layers of paint are on that boat, I think I counted 5?????? that should have held it together, whay reinforce??????

After the paint that Ronny did, I sanded all that back off......... The red/yellow paint got mostly sanded off..............

Yes, Rickster, it was ridden non reinforced...... but I did not start really rolling to this year, never really could get myself to commit (been doing nose stabs for so long that it hampered me..........). Plus it is a 97 model!!!!!!!!!! strong...... Took a lickin and kept on ticken........ along with some west systems!!!!!
 
Took a lickin and kept on ticken........ along with some west systems!!!!!

There was deffinitely some glass and resin on the hull but all that was chizzled off in a few minutes.

Well I managed to make it home and worked on this thing all weekend. I started taking the tray apart because it was a little wet and I think that was the best decision I could of made. I ended up finding alot of water (especially by the scupper tube), some blue house-hold insulation jammed in the ski and also a hole in the bottom. So after a little work I got it cleaned up and reinforced. I put a new scupper tube in because I hacked up the old one getting it out and then I used half a caulking tube of 5200 to make sure everything was all sealed up again. I would of refoamed it but I am waiting on highroller to get me a pair of footholds. Also I have to save some work for spring break.:biggthumpup:
 

Attachments

  • 101_1289.jpg
    101_1289.jpg
    95.1 KB · Views: 77
  • 101_1307.jpg
    101_1307.jpg
    65.8 KB · Views: 70
  • 101_1308.jpg
    101_1308.jpg
    76.4 KB · Views: 105
When I wasn't working on the rear of ski I poured some more foam to cover the entire bond line of the ski, especially up in the nose. I sanded all that down and with a little help from skibums4life:Banane01: (he wanted to do the dirty work), then we started to lay the glass and carbon/kevlar down. I got one side down at 4 a.m. on Saturday then woke up at 7 and flipped it over and got the other side done. I pretty happy with how it came out and hope that it will be able to withstand a little beating without cracking anymore.
 

Attachments

  • 101_1296.jpg
    101_1296.jpg
    80.2 KB · Views: 81
  • 101_1304.jpg
    101_1304.jpg
    87.8 KB · Views: 100
  • 101_1306.jpg
    101_1306.jpg
    72 KB · Views: 76
  • 101_1309.jpg
    101_1309.jpg
    127.9 KB · Views: 127
All I have left to do now is finish the tray and then just prep it for paint. Not sure what color I'm gonna use but probably not one of the five that the ski has already been painted. Thank god for orbital sanders.

Some more pictures of the nose inside and out, I've got a good feeling that it will stay on this time.
 

Attachments

  • 101_1312.jpg
    101_1312.jpg
    69.6 KB · Views: 97
  • 101_1310.jpg
    101_1310.jpg
    109.9 KB · Views: 106
Last edited:

Big Kahuna

Administrator
Location
Tuscaloosa, AL
looking good........ the blue foam was from an Ideal that freestylegeek came up with a few years back, he filled up with that stuff, I used a bit, and decided to not use as much........ Looks like Ronald has a good home..

oh, only 3 paintjobs on that ski............
 
Looks like Ronald has a good home..

Kind of funny because my dads name is Ronald and I work on the ski at our new house, confused me at first. Hes in good hands and will be looking like a champ soon.

That blue foam got me thinking because I know that gas eats away at that stuff really well. Just wondering if anyone has ever tried using gas to eat away at the normal foam in the tray? I was curious to try but just kept on going at it with my wire wheel.
 
This past week was spring break for me and what else would I have done but work on the new hull. The main thing I did was get the hull painted. I would have gotten the footholds in and foamed everything but I never recieved the footholds until this past friday and they were not the ones I wanted.

First thing was to get all the old paint off, I started with an orbital and 80 grit but eventually went to a putty knife and just started scraping it off.
 

Attachments

  • 101_1333.jpg
    101_1333.jpg
    73.9 KB · Views: 76
  • 101_1334.jpg
    101_1334.jpg
    68.5 KB · Views: 76
  • 101_1335.jpg
    101_1335.jpg
    67 KB · Views: 65
  • 101_1336.jpg
    101_1336.jpg
    66 KB · Views: 75
Just kept on sanding and eventually got it down to the bare hull. Then we had to move the operation to the paint shop and continued from there. I did a little bondo work where it needed it and then got it primed and ready to paint. You can see in the background that my buddy Steve is looking for the right colors to paint the hull. Originally I was going to use some white pearl and red, and make a design with the majority of the hull being white but my brother didn't want me using his pearl unless I made a sweet design. Well I just wanted to paint the top and bottom deck a seperate color becuase for some reason my paint jobs always get chipped.
 

Attachments

  • 101_1344.jpg
    101_1344.jpg
    50 KB · Views: 58
  • 2007-03-14 005.jpg
    2007-03-14 005.jpg
    63.3 KB · Views: 60
  • 2007-03-14 006.jpg
    2007-03-14 006.jpg
    64 KB · Views: 73
  • 2007-03-14 007.jpg
    2007-03-14 007.jpg
    48.9 KB · Views: 63
  • 2007-03-14 008.jpg
    2007-03-14 008.jpg
    46.3 KB · Views: 65
So after much arguing on what freaking colors to use we decided to go with a very very dark purple metalic on the bottom and a blue on top. I started spraying around 11 pm and just when I was done with the bottom my buddy steve decides that we have to try the ceran wrap affect on the top deck. So I then had to spray the top deck the purple also to have that underneath the blue.

To do the seran wrap affect you spray one heavy coat of the top color then put the wrap down. Well we must not have waited long enough for the purple to dry because when we peeled off the wrap both colors came with it. So it was 1 am and the left side of my ski was totally F@#*ED UP.
 

Attachments

  • 2007-03-14 009.jpg
    2007-03-14 009.jpg
    42 KB · Views: 54
  • 2007-03-14 010.jpg
    2007-03-14 010.jpg
    62.7 KB · Views: 77
  • 2007-03-14 021.jpg
    2007-03-14 021.jpg
    52.3 KB · Views: 82
  • 2007-03-14 023.jpg
    2007-03-14 023.jpg
    49.9 KB · Views: 91
Top Bottom