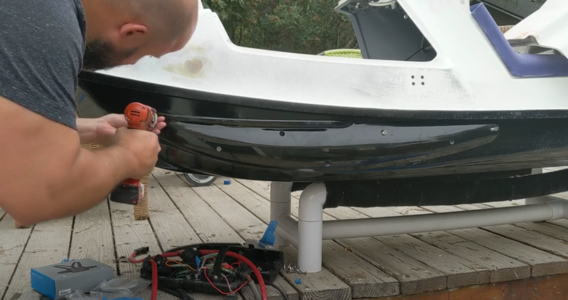
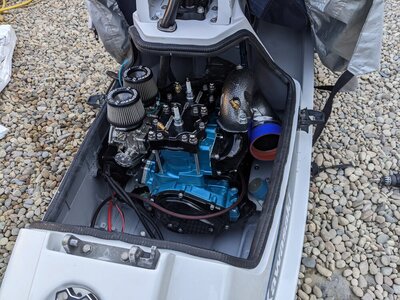
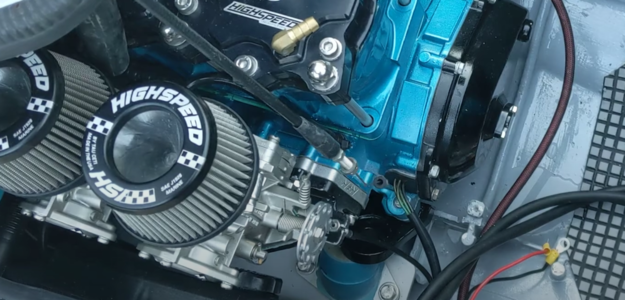
Tubbies went on next.
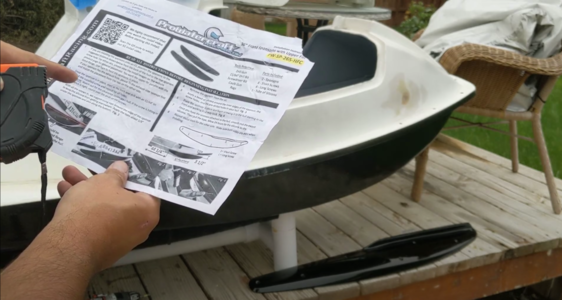
I'd reccomend Prowatercrafts, Blowsion Destroyers, or Toms Tubbies.
Just follow the instructs, dont be a dummy.
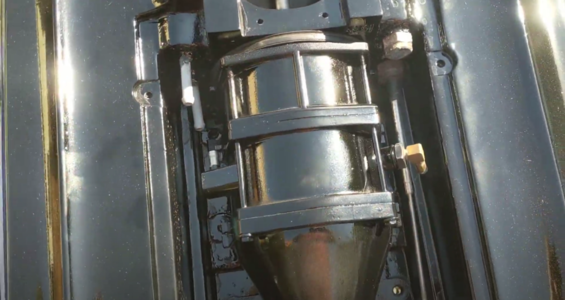
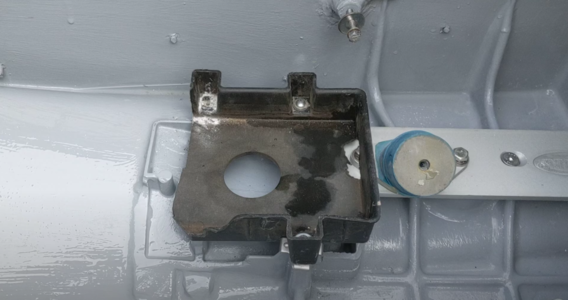
Measure it out - this is specicially important because if you dont, the rear screw may protrude into your foot tray area which would be horrible.
If you are going to make a mistake, error at the side of being too far forward rather than too far backwards.
Put the rear up as high as possible too, and the bottom should be slightly less than flush with the bottom of the hull --- following the hull line all the way forward.
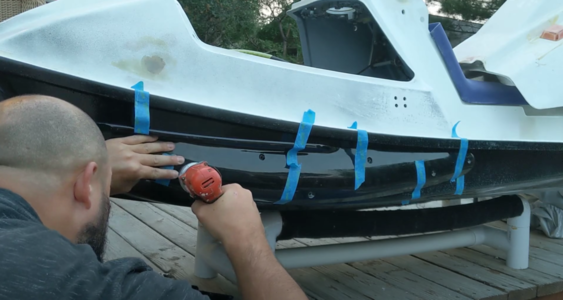
 

Attachments

  • Screenshot 2022-11-12 232934.png
    Screenshot 2022-11-12 232934.png
    684.4 KB · Views: 46
  • Screenshot 2022-11-12 233036.png
    Screenshot 2022-11-12 233036.png
    717.5 KB · Views: 40
  • Screenshot 2022-11-12 232648.png
    Screenshot 2022-11-12 232648.png
    643 KB · Views: 41
Heres a picture showing what you will have to cut in order to make your ride plate of your choice to work.
If you are using the Prowatercraft ride plate like i did, you will have to grind out an arch underneath so that it doesnt bottom out on your pump.
My plat was rocking and would sit flat because it was bottoming out on the pump.
Luckily the prowatercraft plate is extremly thick, so i dont think it mattered too much that i had to grind a groove down the entire middle.


Also, in order to get the intake grate to fit, i did have to do a bit of grinding on the forward area for it to fit into the stock X2 bolt area.

The rear-most area that attached to the shoe fit like a glove, not modification needed there.

At this point i put silicone in all the groves.
 

Attachments

  • Screenshot 2022-11-12 232130.png
    Screenshot 2022-11-12 232130.png
    708.8 KB · Views: 44
-One water line from the pump connected pretty easily.
-The 2nd water line from the other side i had to route underneath the pump and bring it over to the 2nd waterline insert.
-I glassed over the 'stock oem drain' which was basically a 3rd water line.
-I left the trim area alone incase i wanted a trim down the road.

IMPORTANT :
The turn cable wont reach the yamaha 144 pump. But it has an easy fix. Call Rhaas Products and ask them for a turn cable extension and tell them that youre doing an X2 144 yamaha conversion. Theyll hook you up with the right adapter.
 

Attachments

  • Screenshot 2022-11-12 232035.png
    Screenshot 2022-11-12 232035.png
    686.4 KB · Views: 56
Heres what i did for the Bilge.
It mounted really nicely off to the right!!
I just grinded the area flat, and epoxied the blue bracket down.
Also, make sure you add a one way valve so that it wont matter where you place your exit, you wont fill up your ski with water.
I used a Jabsco in-Line Non-Return Valve - 3/4" that i bought off Amazon for 25$.
 

Attachments

  • Screenshot 2022-11-12 234414.png
    Screenshot 2022-11-12 234414.png
    840.9 KB · Views: 53
I tried to get a Round Nose waterbox to work, but the angles were all terrible.
I also wanted to make sure i at least had 2inch from the stinger out to the exit.
So that limited me to getting the SeaDoo HX Waterbox which is what everyone will recommend you for this build.

But since i didnt have my Rhaas outlet as far forward as it should have been, i was left with the B-Pipe stinger going past the inlet on the waterbox by a half inch, if i layed the waterbox flat.

So the way i circumvented this issue was raising the waterbox to an 70 degree angle and then from the Bpipe stinger i used (2) 2" Inch Silicone 90 Degree Elbow Pipe Intercooler Hose Coupler mated with a Billet 2" to 2" Inch Hose Barb connector as well as some house clamps.

I used this same setup to route my fuel neck for the gas tank.

Make sure you use some rubber padding and use the stock tie downs to secure it so that it wont bounce.

The added benefit of using these two right angles is that it allows the bipipe stinger to naturally rest lower which will in return allow the chamber to mate with the headpipe fully metal on metal so that you wont blow couplers as often. You dont want heat to touch those couplers if at all possible, which would happen if you had to lift up your bpipe stinger.
 

Attachments

  • PXL_20221028_004403042.jpg
    PXL_20221028_004403042.jpg
    113.4 KB · Views: 46
  • Screenshot 2022-11-12 235905.png
    Screenshot 2022-11-12 235905.png
    665.1 KB · Views: 42
  • Screenshot 2022-11-12 235948.png
    Screenshot 2022-11-12 235948.png
    679.2 KB · Views: 44
Last edited:
Engine should drop in at this point.
I couldnt find a way to get to the engine mount bolts without having the bpipe first removed.

Thus you will have to do this kind of tricky... And hopefully i can explain this.
-First, make sure your waterlines are connected to the manifold.
-Place the engine into the hull, it can be shifted to the front area.
-Connect your starter cables and route cables accordingly.
-Connect the waterlines up to the rear of the engine bay. Make sure you use hose clamps at this point because you wont be able to get to them past this point.
-attach the bpipe headpipe (leave chamber off).
-slide the engine back into place.
-Tighten all engine mount bolts to torque specifications.
-As previously posted, the waterbox should all be mounted as well as the couplers set in place. At this point, connect the BPIPE chamber into place. Should slip right in.
-Connect the Gas tank up.
-Add the Battery Box mount. ( i had to trim mine quite a bit for it to fit. as shown in pics)
-As shown in the pictures as well, i was able to use dual carbs with the larger tornados and it still had clearance!!! Awesome!! But I was told I have a unique manifold and is closer together compaired to most. So you MAY have to use the smaller tornado air filters in order to get it to fit. Or you could instead just go with a single 46mm mikuni carb.
 

Attachments

  • PXL_20221011_231543221.MP.jpg
    PXL_20221011_231543221.MP.jpg
    212.7 KB · Views: 45
  • Screenshot 2022-11-12 235038.png
    Screenshot 2022-11-12 235038.png
    672.6 KB · Views: 41
  • Screenshot 2022-11-13 000103.png
    Screenshot 2022-11-13 000103.png
    723 KB · Views: 40
  • Screenshot 2022-11-12 235804.png
    Screenshot 2022-11-12 235804.png
    797 KB · Views: 44
  • Screenshot 2022-11-12 235657.png
    Screenshot 2022-11-12 235657.png
    947.4 KB · Views: 45
  • Screenshot 2022-11-12 235518.png
    Screenshot 2022-11-12 235518.png
    816.7 KB · Views: 42
  • Screenshot 2022-11-12 234200.png
    Screenshot 2022-11-12 234200.png
    487.1 KB · Views: 39
I decided to go with the UMI Steering as i heard that was the biggest upgrade you can do on an X2.
They were right!! that steering is awesome!

I had to use a Kawasaki 750SX throttle cable because the stock X2 cable would not hook into the 701 engine without fabricating some type of mounting plate .

As you can see in the attached picture, the stock X2 cable just dangles and doesnt have anywhere to mount.

So instead i just used the 750 sx cable which i had it routed underneath the carbs to come up from the bottom up to the stock 701 mounting plate.
I had to use a vise to flatten out the metal 90 degree bend that tht 750sx cable had, but that was an easy solution.
Im sure ANY throttle cable would work. just give it a try.

Also used a Yamaha start/stop switch as it hooks right up to the Yamaha EBox.
 

Attachments

  • Screenshot 2022-11-12 234550.png
    Screenshot 2022-11-12 234550.png
    833.7 KB · Views: 38
  • Screenshot 2022-11-12 235804.png
    Screenshot 2022-11-12 235804.png
    797 KB · Views: 39
  • Screenshot 2022-11-13 005821.png
    Screenshot 2022-11-13 005821.png
    905.2 KB · Views: 43
Good job!

How many Hours and US Dollars did this Conversion take?

May want to reconsider relocating the E-Box to a higher Location as the X-2 is considered a Semi-Submersible Class Vessel ;)...
Im not sure how many hours, but it took a few months to do. Bought it mid summer and had it done by October.
I wish it took longer, as thats where i get most my enjoyment from jetskiis.

E-box is suppose to be water tight, plus i have a bilge so it shouldnt ever have much water in it. bought a new hood seal too.
I guess when i run into my first issue ill relocate it. but i like the location its in. very clean looking.
 

hornedogg79

dodgin' bass boats
Nice write up and video. You saved me some time with the install sequence tips. You can really dry these things out by blocking the factory breathers then making a hood liner and adding breather hoses that go to the bottom of the hull.
 
Nice write up and video. You saved me some time with the install sequence tips. You can really dry these things out by blocking the factory breathers then making a hood liner and adding breather hoses that go to the bottom of the hull.
Dry them out meaning prevent water from entering? To be honest i havent even really road an x2 yet, (i will this summer), so i dont know how bad they gain water to the bay.
I did get a new liner, and install some backwards facing scoops on the hood. Im not sure i want to tear up my hood and repaint and stuff, but if its bad i guess i may have to.
 
Location
dfw
X2 tend to take in more water than a standup so an electric pump really helps. The hood has a crossover style vent system but that goes away when the top hump gets removed. A vent hose or two that crosses from top to the bottom of the hull will work very well but almost nobody ever does this. I incorporated a freer flowing vent system in the hood once it was shaved. Its not perfect since the vent passages stop at the bottom of the hood but it works pretty good.
 
Last edited:

WFO Speedracer

A lifetime ban is like a lifetime warranty !
Location
Alabama
So I have to ask this , is it really worth it for a 4mm bigger pump with a lot more parts to fail, the Yamaha has a lot of parts to line up, go out ect, the Kawi setup is damn near bulletproof as long as you have a good through hull bearing. This is a serious question I really would like to know.
 

hornedogg79

dodgin' bass boats
So I have to ask this , is it really worth it for a 4mm bigger pump with a lot more parts to fail, the Yamaha has a lot of parts to line up, go out ect, the Kawi setup is damn near bulletproof as long as you have a good through hull bearing. This is a serious question I really would like to know.
Serious question. Haven't you been working on a 300sx and a X2 build for like 15 years?
 

WFO Speedracer

A lifetime ban is like a lifetime warranty !
Location
Alabama
Serious question. Haven't you been working on a 300sx and a X2 build for like 15 years?
The 300SX was parked until last year, I have been steadily working on it to get it finished the X2 had a bunch of parts stolen and I had to do a lot of backtracking, I also have several motorcycle projects I am working on, that being said I fail to see what any of that has to do with my question.

Refer back to the first post on this thread :

100% here to answer every question, so please ask them! I really enjoyed this project and it was definitely doable!
 
Last edited:

hornedogg79

dodgin' bass boats
Just seems like op is taking flak for doing what he wanted to do and knocking it out in a few months. Impressive to me. Getting harder to find a 650 pump without chipped stator vanes or swollen wear ring. I have a pile of junk 750 cylinders with cracked nonreplaceable sleeves and cranks with bent rods too. Would much rather maintain a yamaha.
 

WFO Speedracer

A lifetime ban is like a lifetime warranty !
Location
Alabama
He certainly isn't catching any flack from me, it looks to me like I am catching flack for asking a question, are you reading between the lines somewhere ?

There is no negativity anywhere in my post , I simply asked a question, last time I checked that is how forums operate, My X2 has a Seadoo pump in it, to each his own.
 
Top Bottom