You are using an out of date browser. It may not display this or other websites correctly.
You should upgrade or use an alternative browser.
You should upgrade or use an alternative browser.
Fearlessnut's Wamilton Freeride Ski Build
- Thread starter Mark Gomez
- Start date
WILKEY
SO FAR CHANGE SUCKS!!!!!!
#3 all the way bro.. that thing will look sick.. u got some serious drawin skills
yamaslut
kill it
- Location
- Daytona Beach, Florida
3 and hurry up and get that thing done... Daytona is coming up quick!!!!
:Banane57:
:Banane57:
wydopen
onthepipe
- Location
- Goleta the Goodland
dont even bother with paint mark!!..it will be beat in the first few weeks anyways...just get it wet
ckjetski
BRAAAAP
- Location
- San Clemente/Santa Barbara CA
dont even bother with paint mark!!..it will be beat in the first few weeks anyways...just get it wet
YA MARK LISTEN TO ANDREW!!! Just Ride!!! :wave:
KR
www.krlines.com
- Location
- San Diego, California
#1, git-r-dun
Mark Gomez
is where the surf is
- Location
- Fullerton, CA
Alright Alright... well see I'll talk to my fiberglass/paint guy when he comes back from vacation to weigh the good and the bad. Main point of paint though is to stand out in photos, black was only semi good when Ludo took shots with his multi-thousand dollar camera equipment.
Thanks for the support on the ideas though its between 1 and 3 now.
Hang tight for about 20-30 min I will post everything that happened this weekend.
-Mark
Thanks for the support on the ideas though its between 1 and 3 now.
Hang tight for about 20-30 min I will post everything that happened this weekend.
-Mark
Mark Gomez
is where the surf is
- Location
- Fullerton, CA
Update 1
Ok so Friday i received my composites from US composites.
1 yard x 50" of:
-5.5 oz Carbon Blue Kevelar hybrid
- 5.7 oz Carbon Fiber
and
1 quart kit of 2lb foam.
Saturday is what kicked off November Fiber Fest.
Kevin Rickon (Krickon) drove over with eddies old fx1 he now owns... on the roof rack:icon16:.
While working on my ski I would help him out with few things here and there.
Then Chris (CKjetski) came over later with his friend Kevin to Cut his handle pole and hang out. it was a fun day. Kevin stayed over so we could get back to work 8am sunday morning.
Attachments


Mark Gomez
is where the surf is
- Location
- Fullerton, CA
Update 2
I sanded the entire inside of my hull that was going to be laid up. That took a good amount of time.
I then foamed and shaped the inside of the nose to make a wide flat bonding surface around the handle pole bracket area and the nose.
I sanded the entire inside of my hull that was going to be laid up. That took a good amount of time.
I then foamed and shaped the inside of the nose to make a wide flat bonding surface around the handle pole bracket area and the nose.
Attachments


KR
www.krlines.com
- Location
- San Diego, California
lol, we do work!
Mark Gomez
is where the surf is
- Location
- Fullerton, CA
update 3
I sanded the epoxy filler I applied to the underside of the hood seal. it wasnt flat so I mixed up some body filler, filled in the small gaps and uneven spots, then sanded flat to be ready to lay up.
after Kevin left mid Sunday I decided to make a scene by pushing the ski's out and putting up a wamiltons banner I had. I live right next to a junior college so my street gets a lot of traffic. I definitely had a lot of people driving a little slower or watching as they drove by this little project scene.
With everything sanded and prepped, I went inside to cut the carbon blue Kevlar from my base template.
This was not too bad considering i used scotch tape to cut between(as recommended by a local fiberglass supply shop.) It turned out great with the tape, then turned into the ugliest yeti as I began to peel off the tape that took stands of Kevlar with it.
Attachments


Mark Gomez
is where the surf is
- Location
- Fullerton, CA
update 4
Despite how ugly the edges of the lay up went. I was able to cut cleaner patches to lay over the shredded and bare looking areas.
So it didn't come out as one big piece as it originally looked but it still looks pretty decent. Its my first time doing this so woop de doo, I'm more excited to have done it, besides with everything inside you wont see as much of the detail anyways.
That was it for that night. it was 1 in the morning when I finished laying everything up with slow hardener. The weather was really moist and cold so the curing process was SUPER slow which actually helped while I laid in some of my patches. I brought everything inside and set up my two flood lights on hi to warm the hull as it cured overnight.
Attachments


Mark Gomez
is where the surf is
- Location
- Fullerton, CA
Update 5
I woke up this morning and made all my templates for the peices i would lay up on the sides and nose of the ski.
I cut the template pieces in 1 oz cloth for my base layer and then again in the Carbon fiber which cut and stayed together 100 times better than Kevlar did!
I also removed the blue tape from the Kevlar lay up the night before to see how it all came out. :shrug: works for me Its not the best whats so ever but I guess the pride of doing it myself makes it look a little better. I think there is a fat chick and beer metaphor for that but I wont get into that.
I then taped off spots around the hull that didn't need the chance coming in contact with resin.
Attachments


Mark Gomez
is where the surf is
- Location
- Fullerton, CA
Update 6
I began to lay up everything which took about an hour and a half from first activation of resin to the last roll down.
I was so hands on and busy with the entire process I didnt snap any work in progress photos. I can barely do fiberglass on my own let alone snap photos at the same time:stooges:
I'll explain what i did:
The handlepole bracket area where I foamed, I laid in 2 layers of 1oz cloth followed by a sheet of Carbon.
The nose where I foamed I laid in one 1oz cloth, followed by a heavy duty Bioweave knitted cloth, THEN followed by a sheet of carbon and a few carbon patches to cover the gaps too complicated and big for one template.
the upper rail sides which I didnt go up all the way from my previous lay up in July. I laid up a matching size sheet of 1oz cloth below carbon.
It all came out fairly well. The pictures were taken 30 min ago as it is curing in my garage under the flood lights again.
Attachments


Mark Gomez
is where the surf is
- Location
- Fullerton, CA
last update from this weekend
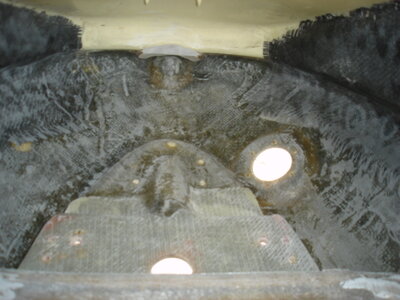
The last pic of the other side included.
Ok, One thing I don't understand is why all the carbon I laid up last July looks the way it does in the last picture. I didnt do anything to it after it cured but ride. Why is it like this? can
I make it look new again?
or should I just scuff it and lay another layer on top?
Thats it!
Successful, extremely busy, and LONG 3 days.
Let me know why my previous lay up turned into that crappy cloudy mess!
thanks
-Mark
Attachments


Last edited:
stanton
High on jetskis.
- Location
- atascadero,ca
wow mark you did alot of stuff that i wouldnt have.
1. do it all in one day, if you have to split it up do nose, port, starboard. i pour my filler and lay glass on it before it sets so you can shape it with your hands and dont have to waste time and supplies sanding.
2. use the largest pieces you can, and not have the seam on the bondline.
3.not lay the bottom, only where it needs it.
Mark Gomez
is where the surf is
- Location
- Fullerton, CA
wow mark you did alot of stuff that i wouldnt have.
1. do it all in one day, if you have to split it up do nose, port, starboard. i pour my filler and lay glass on it before it sets so you can shape it with your hands and dont have to waste time and supplies sanding.
2. use the largest pieces you can, and not have the seam on the bondline.
3.not lay the bottom, only where it needs it.
1.Yeah I would have done that but I had the filler materials earlier
2. yeah... seemed like the best Idea at the moment, the bond line was actually reinforced last July, I just didn't make it all the way up the ski.
3. true but i was able to lay up all my other stuff. I just got excited when I saw they had blue and black carbon Kevlar for cheap.
Thanks for the advice though, doesn't hurt I wont say everything I did was perfect/ necessary/ or right but I did it and shouldn't have to work on it again while I :splatt::splatt::splatt: ...learn
stanton
High on jetskis.
- Location
- atascadero,ca
best way to learn. i got lucky and brett let me learn on his ski. luckly it was pretty easy and it came out great. maybe just a little too much resin but its good.
i just noticed you didnt grind out the ribs. your going to wish you did.
oh and #1!
i just noticed you didnt grind out the ribs. your going to wish you did.
oh and #1!