2023 Superjet with hull damage. Fix options?

I picked up this 23 SJ last night for a killer deal in my opinion (6k). The PO didn’t tie it down properly last year and it rolled off the trailer. No cracks or holes as far as I can tell. Let it sit in water for 10 minutes and checked it, no water, rode it hard for 30 min and little if any water in the engine bay. Almost none out of the drain plugs too.
IMG_0873.jpeg
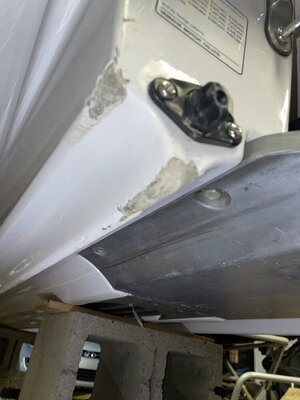
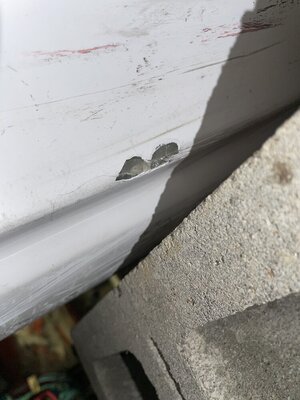
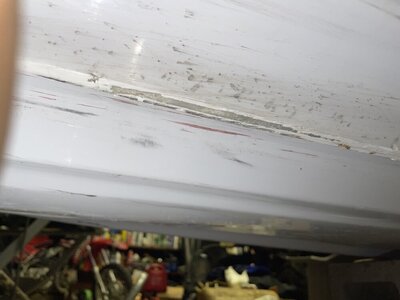
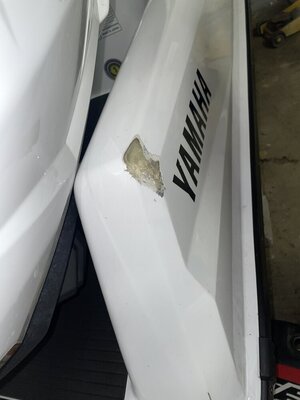
It has 2 big marks on the side of the hull that aren’t very deep but are definitely rough. On the bottom deck rear chines at the back of the ski are also damaged and a few gouges that go through the paint and can see the blueish green material the hull is made of around mid deck. Im away from home for work for another week don’t have any pics of underneath but here’s the sides. IMG_0874.png
IMG_0836.png
I’m just wondering what fix you guys would recommend. I am going to take my time and try and do it right, but I also want to be able to ride it by June. Talking with some friends and reading I was thinking epoxy fairing compound and a good (to best of my abilities) paint job using color rites aerosol kit. Any help is appreciated!! Hoping I got a good deal
 

Quinc

Buy a Superjet
Location
California
Some epoxy spray paint and a sticker. Or do a search for WFO and check out his threads. Tons of info and pictures on hull repair and paint/gelcoat etc. :)
 

Kohldanielzimmer

Sierra Nevada Runoff Rider
Site Supporter
Location
Ahwahnee, CA
I’d do some light glass work and then get the gel coat repair kit from color rite. Most of the damage looks to be a thick gel coat rather than structural.
 
Saw that one listed for a while. Easy fix, may not look the best unless you really dive in.......
Yeah I think for the price I don't need it to be perfect, just want it to look somewhat decent. These aren't my pics. I pulled them from another thread concerning SXRs, but this is about what my chines look like on both sides maybe a little deeper. I saw people recommended marine tex for that fix. Would that work for this ski? I'm not concerned how under the waterline looks, just don't want to wear through there.

chine2.jpgchine.jpg
 

Kohldanielzimmer

Sierra Nevada Runoff Rider
Site Supporter
Location
Ahwahnee, CA
Marine Tex is good but if it’s just gel coat damage I highly recommend the stuff I linked. I have personal experience with repairing gel coat on the 4t SJ.
 

WFO Speedracer

A lifetime ban is like a lifetime warranty !
Location
Alabama
I wouldn't use Marinetex at all, you can repair it with thickened epoxy and add black colorant to it or use thickened black gelcoat , personally I use gelcoat..

If you are wanting to do it on the cheap, grind it back enough to get all the loose flaky stuff gone and you need good clean edges, get some black tooling gelcoat from US composites it's about $30 .75 , a quart of white gelcoat is like $23.00 , those are the cheapest gelcoat prices anywhere and its decent gelcoat , you will also need cabosil to thicken it up, a quart of it is like $5.00 , the gelcoat comes with the hardener. So for what that one quart of gelcoat he mentioned costs you can have both colors and the cabosil you will need the cabosil either way. I have used the tooling gelcoat for repairs it is a little harder to sand other than that you won't know the difference.

Mix the gelcoat and hardener per the instructions , it mixes at from 1 to 3 % hardener to gelcoat , depending on the temps you are working in 1% for 80 and above 2% up to 70 degrees 3% if it's ;lower than 60 degrees , I find it easiest to mix it up in 100CC batches and use a small syringe to measure the hardener, you can also use a much larger syringe to measure the gelcoat , most cattle feed store have both of these syringes for cheap.

With the gelcoat mixed with the hardener start adding cabosil to it till you get it as thick enough to pull, think peanut butter , put the gelcoat on a piece of cardboard and use a business card as a spreader , you want to tape up around the edges of the repair with masking tape, you want at least three to four layers , this gives you some depth and allows for some gelcoat shrinkage, spread it as evenly as you can with the business card then cover it with a piece of wax paper , this does two things , gelcoat will only surface harden in the absence of air , the wax paper does that for you plus you can further smooth out or manipulate the gelcoat putty under the wax paper to get it where you want it, when it's dry it peels right of and you start the sanding process. I would say start with 220-320 then go to 400 -600 and then as far as you want all the way to 2000 to get it smooth and shiny then buff it off.

I know all of this sounds complicated but it's really not and if it doesn't turn out right the first time is like welding grind it off and do it again. If you need any help LMK I will try to steer you in the right direction.
Do I need filler or anything else or just gel coat? And if I don't have a grinder can I use a dremel?
 

WFO Speedracer

A lifetime ban is like a lifetime warranty !
Location
Alabama
Do I need filler or anything else or just gel coat? And if I don't have a grinder can I use a dremel?
just don't make it too thick with the gelcoat , gelcoat is hard and has no flex at all , if you need to add thickness mix the cabosil with epoxy and use that as filler it's strong as hell but kind of a bitch to sand . regardless of what anyone says the gelcoat will stick to the epoxy, jus make sure to leave the epoxy at least 80 grit for a mechanical bond .

A dremel will work fine just make sure the edges are smooth and not jagged .
 
So since I’m manic I drove 2 hours home and snagged some pictures for you guys. Here are all the gouges that need fixed on the bottom and the 2 on the side. Still thinking just gel coat?
IMG_0898.jpeg
IMG_0893.jpeg
IMG_0897.jpeg
IMG_0889.jpeg
IMG_0890.jpeg
IMG_0892.jpeg
IMG_0907.jpeg
IMG_0900.jpeg
IMG_0899.jpeg
 
And I also want to know if I’m being a hypochondriac about the inside of the hull. I’m not sure the process these go through being made, but is it normal to see what I perceive as “cracks” and filler in certain spots? The “cracks” are smooth to touch and don’t correspond to any damage on the outside of the hull.
IMG_0901.jpeg
IMG_0909.jpeg
IMG_0912.jpeg
IMG_0915.jpeg
IMG_0911.jpeg
IMG_0910.jpeg
IMG_0916.jpeg
 
After digging on Facebook groups these hulls are resin transfer molded and gaps and “cracks” are common specifically around motor mounts and are just superficial. If you guys think gel or epoxy is best for those gouges I’ll get some ordered up today, fix it up and beat the brakes off the ski until I gotta fix it again
 

WFO Speedracer

A lifetime ban is like a lifetime warranty !
Location
Alabama
There is a lot of conflicting info going on on these skis , on the specs I pull up it says it's SMC , the pics from the inside look like SMC but the damaged areas on the chines like GELCOAT to me , then this article on the Watercraft journal says it's gelcoat , at this point I would be calling a dealership and finding out exactly what it is made of before ordering anything . SMC hulls are painted with Polyurethane single stage , on that rear corner it's already damaged take a wood chisel and a hammer and pop a small chip off of it to inspect , if the white part is thick it's gelcoat , if it's thin or if there is any indication of primer under the surface it's painted SMC.

Trust me on this one Yamaha uses just enough paint to cover the surface on SMC skis, it is very very thin , if you can find a spot sand it and see how long it take to get through to the surface underneath , if it's gelcoat it will take you a while.

Either of those two are repaired the same , with epoxy, cabosil and fairing compound , look on this thread to see tips on chine repair on an SMC ski. :


Last edited:
Top Bottom