Vumad
Super Hero, with a cape!
- Location
- St. Pete, FL
I took my mold down to the fiberglass place. I forgot the name... so I can't give them a free plug. Maybe Tom can post the came... I think it's Fiberglass Coatings Inc in St. Pete. Anyway, some very knowledgeable guys there. If you need glass supplies in the Bay area, good place to go. The guy there Pat knows more about fiberglass than I know about anything.
Anyway, he said my mold looked good. Of course, I should have done more layers at one time... but the glass layup was good. Tom was there too and they pointed out some air bubbles. I picked up a new aluminum squeege thing that should help some. It's better than my paint roller... that's for sure... The squeege I bought is sitting in some acetone because I just used it. I'll have to post a picture of it later.
I've been using the 2" cheapo brushes.
Tonight I layed 6 more layers of cloth. I sanded the mold because the cheap poly resin has a wax in it that surfaces when you use it, so sanding is requred to remove the wax and get a better bond. I cut 6 rectangular piece of cloth. I mix my poly resin 8 ounces at a time. I ended up using 2 8 ounces and a 6 ounce of resin for a total of 22 ounce of resin with no waste. 20 ounces would have been better for the ride plate but I also used some on my next project. It was about 60 degress out.
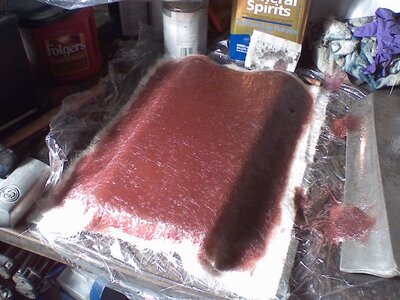
The 1st picture is my ride plate mold with a total of 8 layers on it now. I may or may not add more layers to it... How many layers will the final ride plate (not the mold) be to be stong enough to be useable? I'm using 1.5 OZ cloth with poly resin...
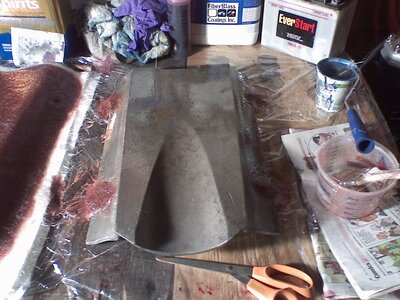
The second picture is going to be my next project. It is a Jet Dynamics ride plate. I intend to use this next project to continue practicing using glass, but this project will be one in which I make a quality plug, one that is smooth for a hopefully better quality mold. I will lay it out and make sure everything is smooth. I will use PVA on the second mold and maybe even Gel coat. At this point, I only put some resin on it to fill the holes, and a pile of cloth in the mounting holes to smooth them out. The mounting holes are recessed, and I don't want them to be recessed in my new plate, so I'm building them up with glass so I can sand it smooth to match the curve of the rest of the plate.
Anyway, he said my mold looked good. Of course, I should have done more layers at one time... but the glass layup was good. Tom was there too and they pointed out some air bubbles. I picked up a new aluminum squeege thing that should help some. It's better than my paint roller... that's for sure... The squeege I bought is sitting in some acetone because I just used it. I'll have to post a picture of it later.
I've been using the 2" cheapo brushes.
Tonight I layed 6 more layers of cloth. I sanded the mold because the cheap poly resin has a wax in it that surfaces when you use it, so sanding is requred to remove the wax and get a better bond. I cut 6 rectangular piece of cloth. I mix my poly resin 8 ounces at a time. I ended up using 2 8 ounces and a 6 ounce of resin for a total of 22 ounce of resin with no waste. 20 ounces would have been better for the ride plate but I also used some on my next project. It was about 60 degress out.
The 1st picture is my ride plate mold with a total of 8 layers on it now. I may or may not add more layers to it... How many layers will the final ride plate (not the mold) be to be stong enough to be useable? I'm using 1.5 OZ cloth with poly resin...
The second picture is going to be my next project. It is a Jet Dynamics ride plate. I intend to use this next project to continue practicing using glass, but this project will be one in which I make a quality plug, one that is smooth for a hopefully better quality mold. I will lay it out and make sure everything is smooth. I will use PVA on the second mold and maybe even Gel coat. At this point, I only put some resin on it to fill the holes, and a pile of cloth in the mounting holes to smooth them out. The mounting holes are recessed, and I don't want them to be recessed in my new plate, so I'm building them up with glass so I can sand it smooth to match the curve of the rest of the plate.
Attachments
Last edited:
")