my tubbie overhang question

2006superjet

just one more part....
Location
costa mesa ca
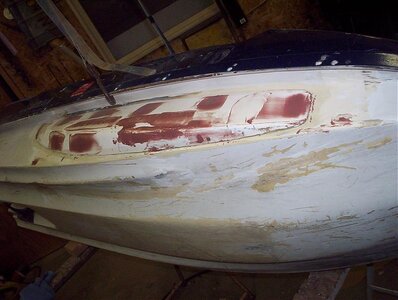
well i just installed both tubbies the second went on without a hitch.
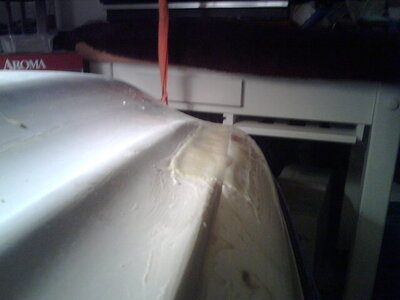
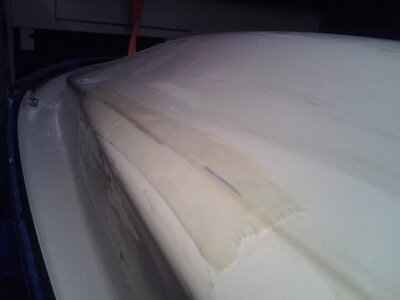
my question is that once i screwd them down 1now over hangs a lil and now its to late. it is about the with of a quarter

my question
lay up glass on the hull, then one over the hull and tubbie to fill in the grove.

or

grind down tubbie prob taking it to the foam then re glassing the shape and prob have to lay over and on the hull to.

i like the idea of one its not meessing with the desing at all
the only thing i could see is a lil drag and maybe pulling but id do both sides the same so its looks the same. this will add strengh so im not worried
 

Attachments

  • untitled.bmp
    351.6 KB · Views: 80

WAB

salty nuts
Location
coastal GA
I'd cut it flush and lay glass over the edge.

Wait, if they are not 5200'd or glassed yet, unscrew and move it up. They are not even supposed to be flush with he bottom. should be up 1/2 inch or so I believe.
 

oxnard111

Creative RE Purchasing
We so cal/central coast fools call em "low boy mounts". Wydopen coined the term. Whenever we mess something up he always says "thats an old ski man's trick". So when we mounted my first tubbie down low like yours he said, "eh, that's an old ski man's trick, 'low boy mounts'!"

What is your total plan with them? Are you going to fair them in with epoxy filler?

Did you use bostik to install them, then wiped all the excess out?

If your not looking to paint you ski, just fair the edges in with some more bostik and go ride. Just fill in the over hang with extra bostik. Do a little at a time, fill it, let it start to dry, then do another layer, until the bottom of the hull flows with the bottom/side of the tubbie.

I did the exact same thing pretty much. Here is a link to my build thread with some pics of the tubbies.

http://www.x-h2o.com/threads/19078&page=3

And the tubbies by blowsion's instructions are to be installed so that they are about 1/2 inch above the bottom of the hull b/c that is what racing rules require. If your not gonna race, just install them where you want. Where ever you mount them, your gonna get used to them regardless.
 
Last edited:

2006superjet

just one more part....
Location
costa mesa ca
nice

i like all the ideas. thanks so much.

ya the instructions called for 1/2 inch from bottom up front so its like flat alomost. the directions call for a flush fit on the octane. im sot racing just want them to stay on. anyone use anything over the screws a white paint or somthing.
 

WaveDemon

Not Dead - Notable Member
Location
Hell, Florida
i like all the ideas. thanks so much.

ya the instructions called for 1/2 inch from bottom up front so its like flat alomost. the directions call for a flush fit on the octane. im sot racing just want them to stay on. anyone use anything over the screws a white paint or somthing.

I ground the heads off but I also epoxied them on.
 

brett

-------------
Location
Ventura,ca
mine are the same way
1_sb2_005.JPG


not too pretty but functional

lowboy-lol
 

Crab

thanks darin...noswad!
Location
Seattle
:headbang::headbang::headbang::headbang::headbang:
 

Attachments

  • 101_5557.jpg
    101_5557.jpg
    64.7 KB · Views: 82

Matt_E

steals hub caps from cars
Site Supporter
Location
at peace
That's how mine are installed. They don't look very "clean", but they are functional.

I had mine that way for two years without problems. I am now in the process of prepping for a new paint job, so they're getting faired in now.
 

2006superjet

just one more part....
Location
costa mesa ca
fixed

now both are flush or a lil past almost like a lil strake it will be good to go strong as a mo fo.
 

Attachments

  • IMG01548.jpg
    IMG01548.jpg
    38.4 KB · Views: 52
  • IMG01549.jpg
    IMG01549.jpg
    26.7 KB · Views: 53
  • IMG01550.jpg
    IMG01550.jpg
    47 KB · Views: 51
Top Bottom