61x topend and stroker cranks

Emailed Crankworks 3 weeks ago to see how it was going. Says its ready for assembly but they've been shorthanded. Hoping to get it in my hands soon. I was going to go with extended cylinder studs because of running the spacer. There's some quality control issues being worked out on those so I looked into counterboring the head to gain back enough threads. I determined the head has more than enough meat to sink the nuts down 8mm with a diameter of 21mm. That allows a 14mm socket to fit and still leaves a ridge all the way around for strength. I didn't have a 13/16" endmill to plunge so I did a quick and dirty setup on the cnc to get what I needed. Hopefully the next update will involve some dry assembly.IMG_20220216_183155088.jpgIMG_20220216_182735968.jpg
 
Last edited:
Big day today. I got the crank back from Crankworks and attempted to drop it in the case. In a previous discussion with Crankworks, he told me the hotrods connecting rod big end was a bit bigger than standard. They offer a service to bring the size down and finish with a shotpeen. The rough math at the time said it would be close. Unfortunately it's still a bit big, so I'll have to set the cases back up and take another 20 thousands off. IMG_20220311_181143994.jpgIMG_20220311_201944996_HDR.jpg
 
Lots of good news today. I trenched another 0.035", so about 0.055" total. that gave the bigger conrods just over 0.020" of clearance. For a reference, I checked the thickness of the case at the bottom of the valley and it was 0.118" thick. I dry fit the bottom end with both base gaskets, spacer, and cylinders/pistons. Checked squish with some clay and came in between 0.045" and 0.050". Should be good enough for the real assembly. The piston bottoms out level with the exhaust port and pokes above the cylinder 0.100", as the math suggested. IMG_20220313_213605140_HDR.jpgIMG_20220314_193754528.jpgIMG_20220314_211805447_HDR.jpg
 
Motor is put together and running. Initial cold and oiled compression was 180 stator/190 pto psi. After first start to blow out the excess oil was 175/180. Keep in mind I'm using the same used pistons and rings as before, probably 200+ gallons but still looking good. I want to dial in the tune and hopefully get one more season on it before boring it out. It does have new conrod bearings, pin, and circlips. Will be a few weeks before it hits water. Very happy with how little vibration there is. Using OEM couch mounts.


IMG_20220319_145115727_HDR.jpg
IMG_20220327_182945685_HDR.jpg
 
Last edited:
I was able to get the ski out to the lake this week for the first water test. No other changes to the ski from last year other than adding 15 pounds of reinforcing fiberglass, switching to a kart tank, and a bump in battery size from a btz9 to btz12. Took it easy and checked over for leaks. Engine felt responsive and acted similar to how it did last year. It ran quite rich but didn't foul plugs after burning a couple gallons. For carbs I'm using silver mikuni sbn44s with drilled returns and running a 70 jet. Last year that got me in the 1.5 psi idle, 6psi wot fuel pressure. I figured that should be rechecked and planned on bumping the jet up a bit due to the stroker crank. Turns out there was some crud in the return jet. I should've checked pressure before cleaning it. I tested on the stand with a 70 and 90. the 90 should work fine, it gets me close to what it was last year. Sounds much more crisp now that it isn't clogged. Also found one of the low speed screws was a half turn different from the other. Will update after more testing is done.
 
Location
brasil
I was able to get the ski out to the lake this week for the first water test. No other changes to the ski from last year other than adding 15 pounds of reinforcing fiberglass, switching to a kart tank, and a bump in battery size from a btz9 to btz12. Took it easy and checked over for leaks. Engine felt responsive and acted similar to how it did last year. It ran quite rich but didn't foul plugs after burning a couple gallons. For carbs I'm using silver mikuni sbn44s with drilled returns and running a 70 jet. Last year that got me in the 1.5 psi idle, 6psi wot fuel pressure. I figured that should be rechecked and planned on bumping the jet up a bit due to the stroker crank. Turns out there was some crud in the return jet. I should've checked pressure before cleaning it. I tested on the stand with a 70 and 90. the 90 should work fine, it gets me close to what it was last year. Sounds much more crisp now that it isn't clogged. Also found one of the low speed screws was a half turn different from the other. Will update after more testing is done.
How do you measure the return and fuel psi?
 
After riding the ski in the lake michigan surf, I was able to make some jetting changes. I started with 117.5 pilot, 107.5 main, 17psi popoff. High and low speed screws out about a turn. Off idle wasn't bad, but the low to high transition was rich. Raised popoff to 22psi and changed jets to 115 pilot and 110 main. Now I can open the low speed screw out to 1.25 to 1.5 turns and is pulling clean. Cut a spark plug to see what the mixture ring looks like. A little thick but overall looks safe. Checked piston tops with a camera. No piston wash, to be expected. Edges look good, no signs of detonation. Hoping to burn 100 gallons of gas this season then reevaluate the topend for a refresh.
 

Attachments

  • IMG_20220630_095124710.jpg
    IMG_20220630_095124710.jpg
    128.1 KB · Views: 47
Popped the topend off for evaluation and to get bored out for 85.5mm pistons. I burned about 100 gallons on the 5mm setup. Piston wash looks typical for reverse jet surf riding. No indication of detonation, no signs of aluminum erosion around the exhaust port edge where I'd expect it. The whole year I kept it at a wax curve with a 28 degree peak, 7400rpm rev limit, 190psi compression. After seeing the underside of the pistons, I think I can keep the dome size the same and bump the timing. Only hardware change will be a fresh set of 46sbn carbs to replace the current 44sbn's.
 

Attachments

  • IMG_20221230_114324461_HDR.jpg
    IMG_20221230_114324461_HDR.jpg
    174.3 KB · Views: 24
  • IMG_20221230_114304475_HDR.jpg
    IMG_20221230_114304475_HDR.jpg
    161.2 KB · Views: 20
Cylinders bored at 0.0045" clearance and fresh 85.5mm prox pistons. Ring gap around 0.014". With a thin film of assembly lube the initial cranking compression was at 210psi. The 10cc bump in volume and better sealing made a difference. I machined a second set of domes that are 2.3cc larger and after a second crank puts it just under 200psi. dual 46 carbs are assembled with 120 pilot, 110 main, and 22psi popoff.

IMG_20230110_143111343_HDR.jpg
IMG_20230115_164545825.jpg
IMG_20230131_090338393.jpg
IMG_20230131_155555972_HDR.jpg
 
Motor is put together and running. Initial cold and oiled compression was 180 stator/190 pto psi. After first start to blow out the excess oil was 175/180. Keep in mind I'm using the same used pistons and rings as before, probably 200+ gallons but still looking good. I want to dial in the tune and hopefully get one more season on it before boring it out. It does have new conrod bearings, pin, and circlips. Will be a few weeks before it hits water. Very happy with how little vibration there is. Using OEM couch mounts.


View attachment 423486
View attachment 423487
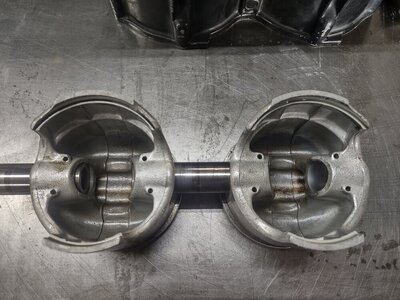
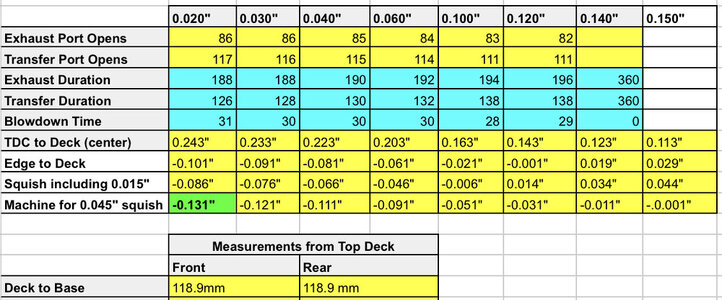
What tool did you use to cut your domes? I’ve got to do the exact same thing. Need to cut down 0.131” if using the stock 0.020” base gasket for my 5mm stroker to get 0.045” squish. Looking for bottom end. Have a 0.080” spacer plate and different sized base gaskets I could use as well. Here’s my port timings with different base gasket thicknesses as measured. Problem is I don’t know what would work best on a stroker.
 

Attachments

  • C7DC5CB7-A797-48C9-AC2C-DB5DC570FF5B.jpeg
    C7DC5CB7-A797-48C9-AC2C-DB5DC570FF5B.jpeg
    126.8 KB · Views: 12
I used my cnc machine at work to cut the domes. I'm able to model the domes in cad first to verify the volume before actually cutting. Having a couple sets of 701 domes gives you extra meat to cut away from. I'm not an expert, but I prefer to keep the port timings as close to stock as possible to keep the powerband in the same location. that means 180 degrees of exhaust and 120 degrees of transfer. You'll make more power with more exhaust duration but will take ignition timing, carburation, and pump work to get it to the high rpm quick.
 
I used my cnc machine at work to cut the domes. I'm able to model the domes in cad first to verify the volume before actually cutting. Having a couple sets of 701 domes gives you extra meat to cut away from. I'm not an expert, but I prefer to keep the port timings as close to stock as possible to keep the powerband in the same location. that means 180 degrees of exhaust and 120 degrees of transfer. You'll make more power with more exhaust duration but will take ignition timing, carburation, and pump work to get it to the high rpm quick.
Ok awesome. Ya my father in-law is a machinist but I don’t believe they have a CNC machine. May have to get them machines somewheres else. My domes are ADA 35cc domes for a 701. I figured if everything was taken down exactly 0.131” then I’d keep the same volume and have the proper squish. Do you have your CAD file that you could share by any chance?
 
I have a couple models that are specific to my volume, squish area and squish. The ada dome cc/psi chart won't work with the stroker crank. I'd suggest 37-40cc to keep your compression below 200psi. I can make you a model that could work but without a cnc mill or lathe it's kind of useless.
 
If you wouldn’t mind that’d be awesome! I can then send it to another shop to get done on the CNC machine. With my base gasket, the edge of my piston is 0.101” above the cylinder deck at TDC. Center of piston is 0.263” above cylinder deck. For squish of 0.045” I need to machine 0.131” into the dome, keeping 10.5 degree angle, dome would then have to be machined deeper as well.
 
You don't need a cnc mill to cut the domes. You can do it on a manual lathe or milling machine just as easily. Easiest would be on the lathe. Chuck the dome at the shoulder where the seal goes into the around the plug threads, dial the desired angle into the cross slide. With a facing tool, touch off, dial in your depth indicator and pull the tool towards you with the cross slide.
 
Last edited:
You don't need a cnc mill to cut the domes. You can do it on a manual lathe or milling machine just as easily. Easiest would be on the lathe. Chuck the dome at the shoulder where the seal goes into the around the plug threads, dial the desired angle into the cross slide. With a facing tool, touch off, dial in your depth indicator and pull the tool towards you with the cross slide.

You descirbed how to do the squish band, which is pretty easy, but did not mention how to do the dome, which is trickier.

Possible with a manual lathe, but by far the dome is the tricky part.
 
You descirbed how to do the squish band, which is pretty easy, but did not mention how to do the dome, which is trickier.

Possible with a manual lathe, but by far the dome is the tricky part.
You're right I wasn't talking about the actual dome part. For that you can use a ball turning attachment in the cross slide. I've seen a guy on youtube modify a boring bar setup for a mill to do ball ends on his mini lathe. I have not tried it but did start a new job this past November operating a manual lathe and milling machine and absolutely love it.
 
Top Bottom