RN Superjet Build

A couple of weeks ago I picked up a RN as I needed a project and something to throw my Yamaha drive line in. Out of the gate the front of the hull had been modified in a rocker style although I dont know how much shorter than stock it is. I knew I needed to chop the hood to match the new hull line, so I started cutting.IMG_0971.JPG IMG_0970.JPG

Next I new that I needed to build a form for the new hood line. I headed to Home Depot, pick up some poly, and started melting.\

IMG_0980.JPG
IMG_0982.JPG
IMG_0986.JPG
New Lines!!

But I knew I needed to sand down a channel for the pole, so that dust began to fly. Also ordered some Footholds form Toby.

IMG_0989.JPG
IMG_0990.JPG
IMG_0992.JPG

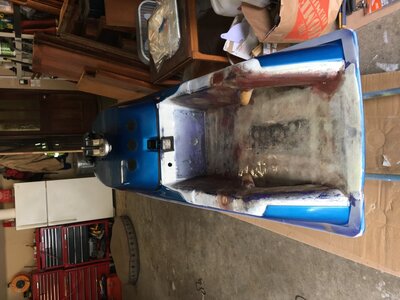
Mocked those up, drilled a trim tube, and discover wet foam. Decided I better just defoam and shortened the hull then.


IMG_0993.JPGIMG_1012.JPG
 
IMG_1013.JPG
IMG_1014.JPG

Ended up taking off 3 total from the back, kept the ride plate inserts intact.

IMG_1018.JPGIMG_1020.JPG
IMG_1022.JPG
IMG_1024.JPG
Also trimmed the rear bond line so the trim clears.

I think I've made it to a point where I just need the temperature to increase so I can lay some glass. I ordered supplies from Us composites. Some 1708 for the hood and some regular 8oz cloth as well. I will probably end up doing some 1708 in the tray and on the rear as well. I stocked up on 5200 to seal up the rear of the tray at the bulk head and for reinstalling all the plumbing. I will be Poly foaming when rebuilding the tray for added support. I dont plan to take it to ocean so I think I will pass up(added weight IMO) reinforcing the sides while the tray is open unless I'm convinced otherwise on here. Stay tuned for warmer weather and itchy skin.
 
E610C610-2B59-4E80-98FA-71C1CC4D8620.jpeg61378781-9988-465A-891A-CF860A6D09E1.jpeg43050FC9-E83A-4EC9-B35A-CE613BB2D323.jpeg6DE38FB0-40D2-4EE0-AD51-6CE013F27717.jpeg864998CE-A2C1-49BB-A925-314DDDB7BC31.jpeg4ECCF876-AF9D-4C02-BC67-F6E0E0F2D2FB.jpeg057D92AC-6B4F-4AE3-9299-45B078FE45AA.jpeg3BAB495E-15F0-4EB7-A103-9FD2BB9E277D.jpeg
One layer on the inside of the hood of 1708. Not sure how I feel about only three layers total but I will mull that over this week. More glass on the rear. That should be it for the bottom. Did some fill on some gouges and low spots. When it dries I’ll sand it smooth and flip her over. I also took advantage of it being upside down to fill in the bond line with epoxy. Next up replumb the lines and build the tray out.
 
Rare opportunity for some weekday work, although I’m getting laid off from my job tomorrow so might not be so rare in the near future. Anyway... about 3 hours of sanding and I’m pretty happy with how it’s coming out. Need to sand the exhaust side down a little more before filling in the pin holes left over.
38723788-D688-4143-A07D-B6797BA69F8F.jpeg28CA3718-8D1C-499A-B726-9A36480F204F.jpegECBCBFD2-A9FB-499A-BF49-D1826B458BAD.jpeg6DD1269B-EA9A-46EE-987F-671ABA038746.jpeg3D3ECD94-4A3E-4680-8534-D4A4D9FA9FBB.jpegA092AADE-80B1-40AD-B1D7-61F28C2181CA.jpeg
 
More hours of sanding, got the whole thing to 320 grit, 80->150->320. Installed the trim tube, sealed the driveshaft tube, and glassed over the pour foam holes. I added a couple more layers of 1708 to the inside of the shortened section. Cut my vent holes in the hood and added a layer of 6oz over the top of the whole thing to smooth it out. Filled a bunch of pin holes with thicken epoxy. It’s suppose to be 70 here this week so hopefully I’ll finish the tray.307336EB-DA0E-4C0B-9E7E-EAEED84516AB.jpeg0BE8ED05-2F3A-476B-B73D-E4828B0D0DD0.jpegD9B27C3C-E6A3-4439-A590-5D00534AE507.jpegEF15E567-43C4-48C8-B4A3-E72A3472D83B.jpeg81C721C1-0C07-4E7B-BF38-FD88747399C3.jpegBB492FC6-1826-48B6-9EF1-1DE1CCAEE8F7.jpegC458F9E3-905E-4B51-A6EA-1AA03C75157F.jpegF71E8BDE-AF83-4A2C-8F16-81BA77793985.jpeg2B7A3673-09F3-4124-8976-77E525EC47C7.jpeg356F69C8-219A-4A1B-9E4B-D4505E212DAC.jpeg
 
Cooling tubes, steering cable tube and exhaust 5200'd in. Tray rebuilt, footholds installed. I filled the tray with polyfoam and ordered some 2 part for behind the footholds. Final skim layer of epoxy on the hood. I'll sand it down smooth and then I think I'm ready for paint. Sending my midshaft out @JetManiac for a rebuild soon.

IMG_1112.JPGIMG_1113.JPGIMG_1114.JPGIMG_1116.JPGIMG_1119.JPG
 
A make shift booth and a trip to harbor freight and it was primer time. I only ordered a quart and that wasn’t quite enough so I’ve ordered another I will say for $10 the HF purple gun works pretty dang nice D3F1A571-F3FD-4BCA-91F3-E129AEAFF39E.jpeg3910A69E-8198-428B-9552-94B4F34AB1C9.jpegF54569DD-5819-475E-8598-A6A5C06F70C5.jpeg
 
Also glassed over the pour foam holes in the tray and gunwales, next step is turf it E9BBFD96-48CD-4703-9753-7938D96EF3BF.jpegE9378517-147F-49BB-85A3-BBFF5B069952.jpegD645F4AE-5EA6-4F07-A9D8-130C0F5BDC80.jpeg92C8188E-C13D-4D9D-8882-D56828494EF0.jpeg
 

Attachments

  • B15F83C6-CEA1-41E9-B645-0AC5B06551FA.jpeg
    B15F83C6-CEA1-41E9-B645-0AC5B06551FA.jpeg
    136.2 KB · Views: 13
Turfing completed, also got my midshaft back from JetManiac, installed that. Next thing on my list is to turn it back over, wet sand polish and buff then install the pump.
9B18679D-97AB-405B-887E-D527CA035F30.jpeg5430EC02-1565-4C10-B008-EC14147D8A7B.jpeg65580498-0E60-4B74-91C4-E191613C9C4A.jpeg2F7332CE-4892-4B67-8C9E-4BCD492AE9CE.jpeg3F13EFA2-BD4E-4D64-95A2-826A5A0DFCDC.jpeg1233B160-75B4-4154-934D-587EF87AC2D2.jpeg6C0D89EA-803E-43F9-AB62-8741082600C8.jpeg79108AF9-0935-4413-B39E-7E2891FA46F8.jpeg
 
Did some more finish work today, no pics tho. Took another route on front hood hook setup, added a racket strap, pole bumper, and installed the tach. I did weigh it today, was 154 lbs including pole, midshaft, and hood with all the jazz. Pretty happy with that I will weigh again with everything installed.
 
Finished the bottom today minus ride plate which I still need to get my hands on. Sanded buffed etc. Pump, steering, trim all installed, added the drain and got the HIN plate back on. Things are getting closer!

IMG_1211.JPGIMG_1213.JPGIMG_1214.JPGIMG_1216.JPGIMG_1217.JPG
 
Top Bottom